
Composting doesn’t have to be messy, slow, or expensive. The best DIY compost bins in 2026 focus on three things: airflow, easy access for turning, and cheap materials you can grab locally (pallets, wire fencing, hardware cloth, old cans). Whether you want a fast “hot pile,” a tidy patio setup, or a simple place to toss leaves, the right bin makes the habit stick. Use the ideas below like a menu—pick one that matches your space, your budget, and how hands-on you want to be.
1. Pallet 3-Bin Staging System
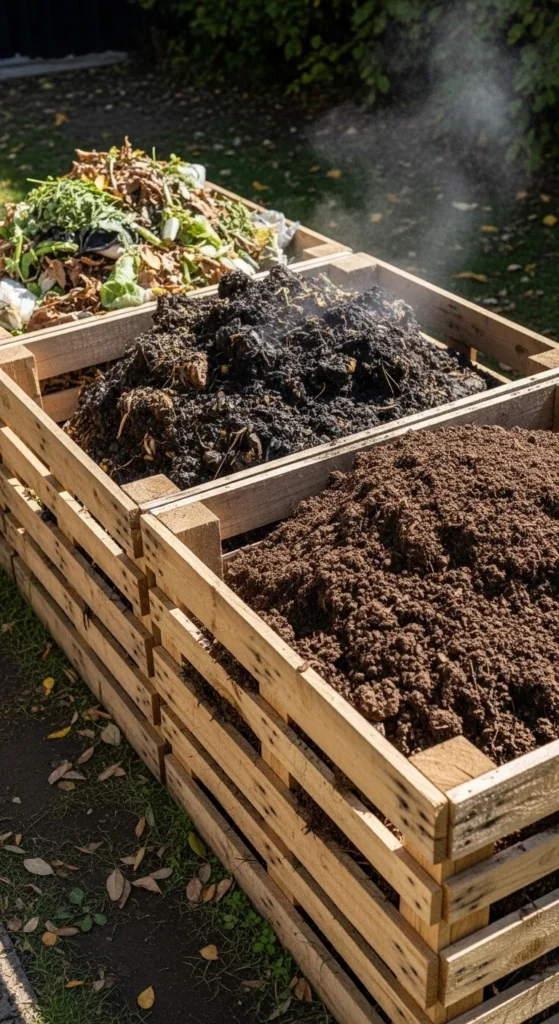
This is the “set it up once, use it for years” option. Three bins let you sort compost by stage so you always have a pile cooking while another finishes.
- Bin 1: fresh kitchen + yard scraps
- Bin 2: active pile you turn often
- Bin 3: dark finished compost you’re ready to use
Budget-friendly tip: ask local shops for free pallets. Choose heat-treated ones when possible.
Build notes that keep it simple:
- Stand pallets on level ground.
- Screw corners with L-brackets for strength.
- Add a front “gate” using one pallet cut into slats.
For turning, move material from bin 1 → bin 2 as it builds up, then shift bin 2 → bin 3 when it looks broken down. Keep a small bucket of dry leaves nearby to cover food scraps each time you add them. That reduces smell and keeps the pile balanced.
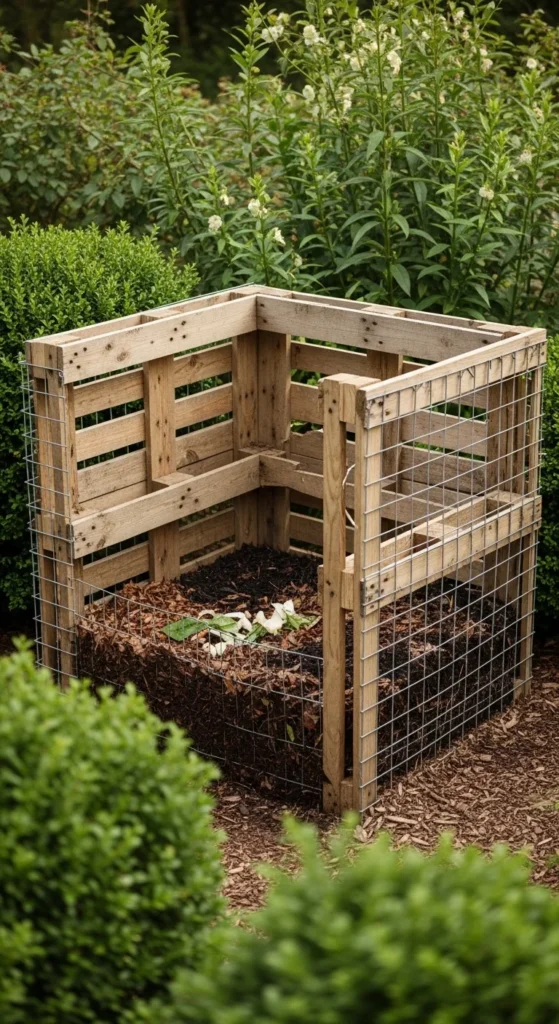
2. Front-Loading Pallet Bin With Hinged Door
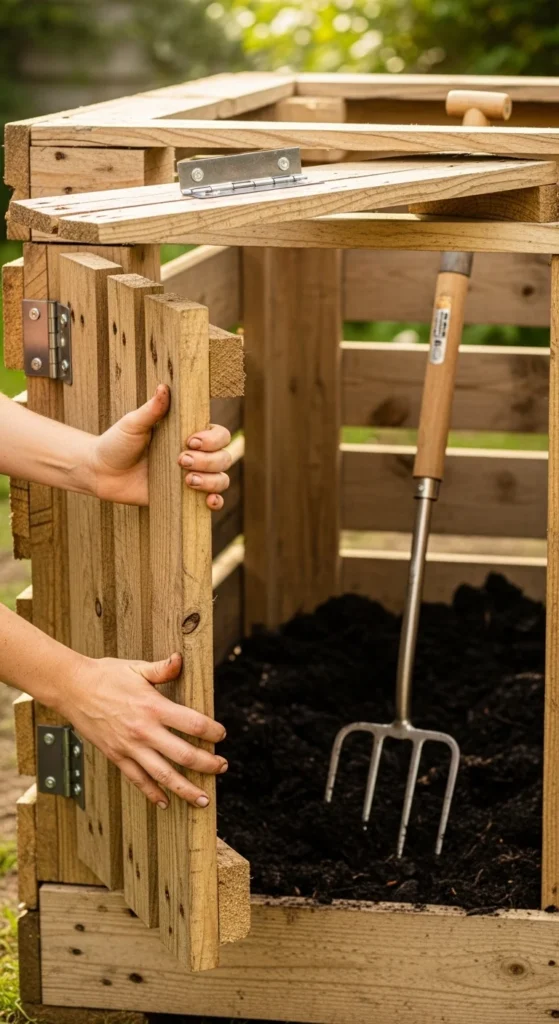
If you want the pallet look without building a big system, make one bin with a door. You get the airflow of pallets plus easy turning access.
Smart build steps:
- Use 3 pallets for the sides and back.
- Add a 4th pallet as the front.
- Cut the front into 2–3 horizontal sections.
- Hinge the top section so it flips open.
Budget-friendly tip: skip fancy latches. Use a simple hook-and-eye latch or a gate latch from a hardware store.
Daily use tips:
- Toss scraps in the center, not the edges.
- Add “browns” after every kitchen dump:
- shredded paper
- dry leaves
- straw
- Turn from the door side so you don’t fight the walls.
If pests are common, line the inside with hardware cloth and staple it to the pallet slats. It keeps airflow while making entry harder for rodents.
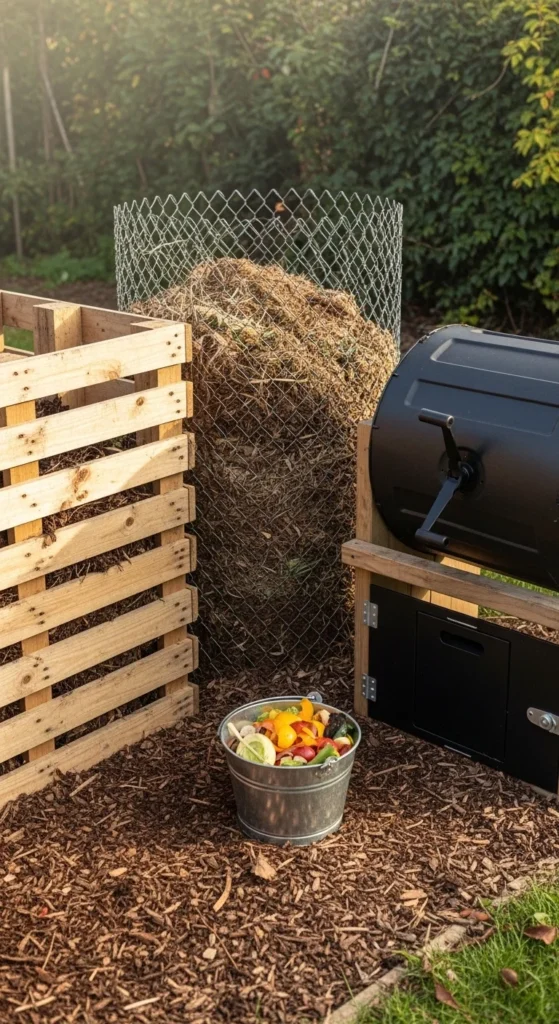
3. Wire Fence Circle “Open-Air” Bin
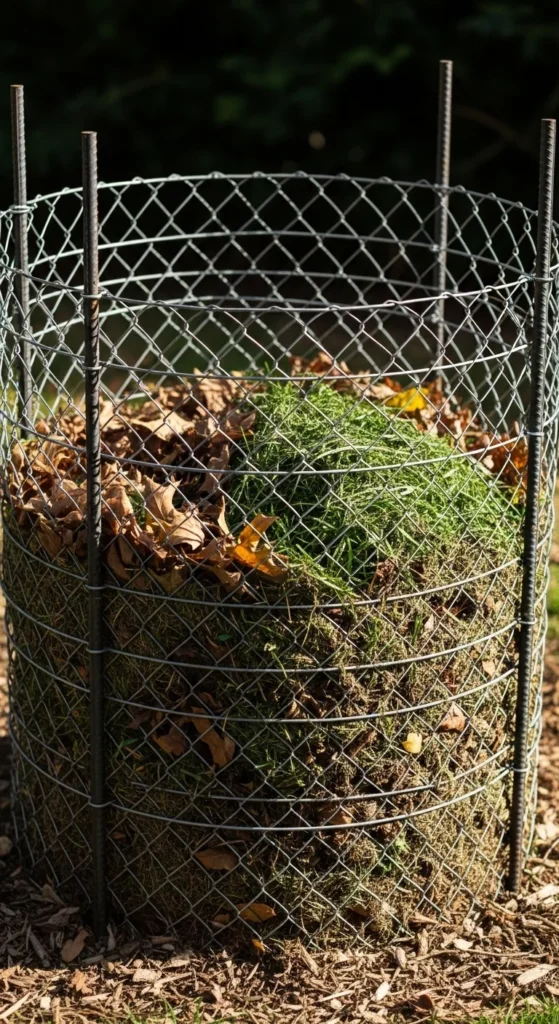
This is the fastest weekend build and one of the cheapest. A simple wire circle has excellent airflow, which helps compost break down faster.
How to make it:
- Buy a roll of wire fencing or welded wire.
- Form a 3–4 foot diameter circle.
- Secure ends with wire ties or clips.
- Stake with rebar or wooden stakes.
Budget-friendly tip: use zip ties short-term, then replace with wire ties later.
How to use it well:
- Keep it in partial shade to avoid drying out too fast.
- Add layers:
- 2 buckets browns
- 1 bucket greens
- Water lightly if the pile looks dusty.
Turning is easy. You can unclip one side, pull the fencing back, then fork the pile and re-wrap the circle. If the look feels too “utility,” add a simple wood screen in front and keep the bin behind it.
4. Wood Frame + Hardware Cloth Square Bin
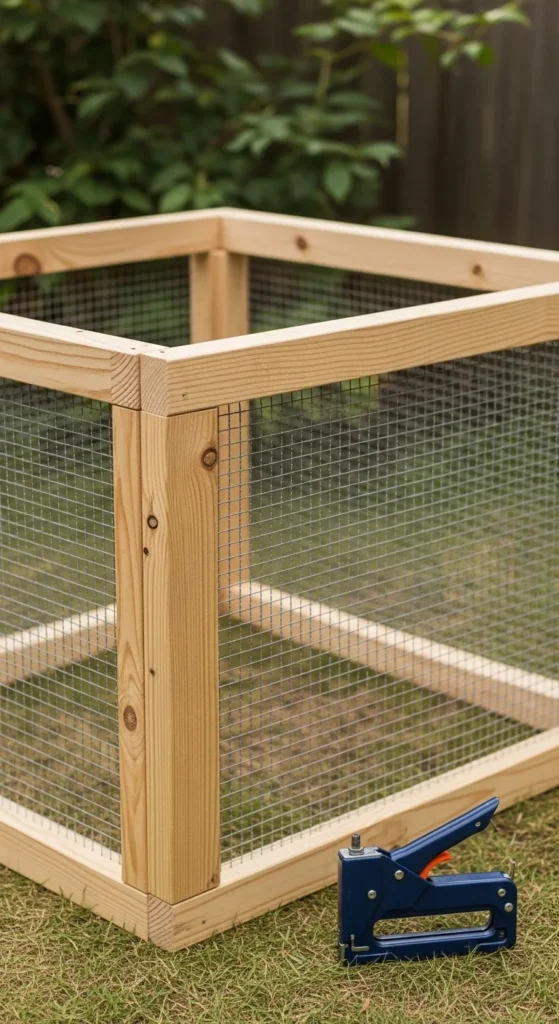
This design is tidy and pest-aware without being expensive. You build a simple wood frame and wrap it in hardware cloth for airflow and strength.
Materials:
- 2×3 or 2×4 boards
- hardware cloth
- staples or screws with washers
Budget-friendly tip: build one panel at a time. You can add a lid later.
Practical features to include:
- A removable front panel for turning
- A lid made from a scrap board frame + mesh
- A raised base using bricks so air can enter from below
Use this bin when you want a cleaner yard look but still want an “open” compost style. Keep a small container of browns nearby so every kitchen add gets covered. That single habit cuts odors and flies in a big way.
5. DIY Trash Can Tumbler With Drilled Holes
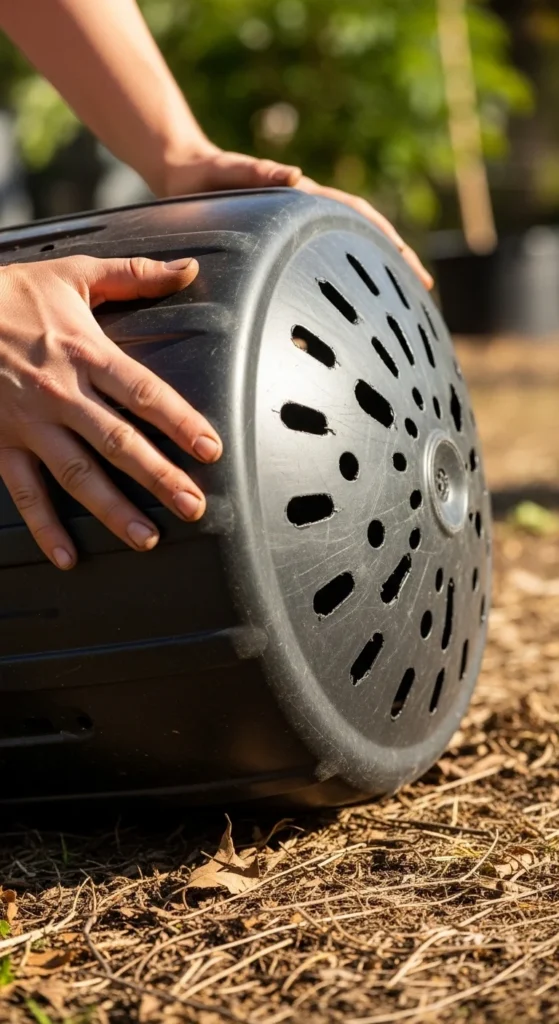
A trash can tumbler is great for beginners who don’t want to fork-turn a pile. You roll it instead.
Quick build:
- Use a sturdy trash can with a tight lid.
- Drill holes all around for airflow.
- Add a few larger holes and cover them with screen patches.
Budget-friendly tip: check used marketplaces for heavy-duty cans.
How to make it easier:
- Don’t overfill. Two-thirds full rolls better.
- Add browns with every kitchen load.
- Roll it every few days.
Place it on flat ground or a small gravel area so it rolls smoothly. If rolling is hard, set it on two parallel 2×4 “rails” so it spins in place. This design also keeps scraps off the ground, which helps with critters.
6. Barrel Tumbler on a Simple Stand
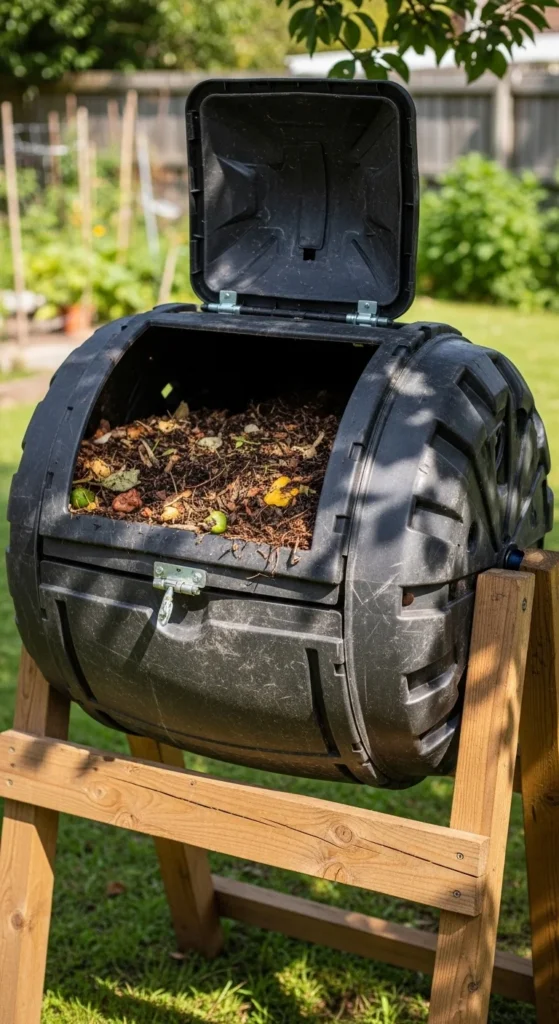
If you want a cleaner look than a rolling can, mount a barrel on a stand. It turns easily and stays in one spot.
Build idea:
- Use a food-safe barrel or large drum.
- Add a small access door with hinges.
- Mount the barrel on a wood cradle or metal pipe axle.
Budget-friendly tip: ask restaurants for food-grade barrels.
Helpful add-ons:
- A handle so you can spin it fast
- Screened vents for airflow
- A lid latch that won’t pop open during turning
This style is great if you compost mostly kitchen scraps. Keep a small container of shredded cardboard nearby and add a handful every time. That prevents soggy clumps and keeps airflow inside the barrel.
7. Wheelbarrow-Ready “Gravity Dump” Barrel
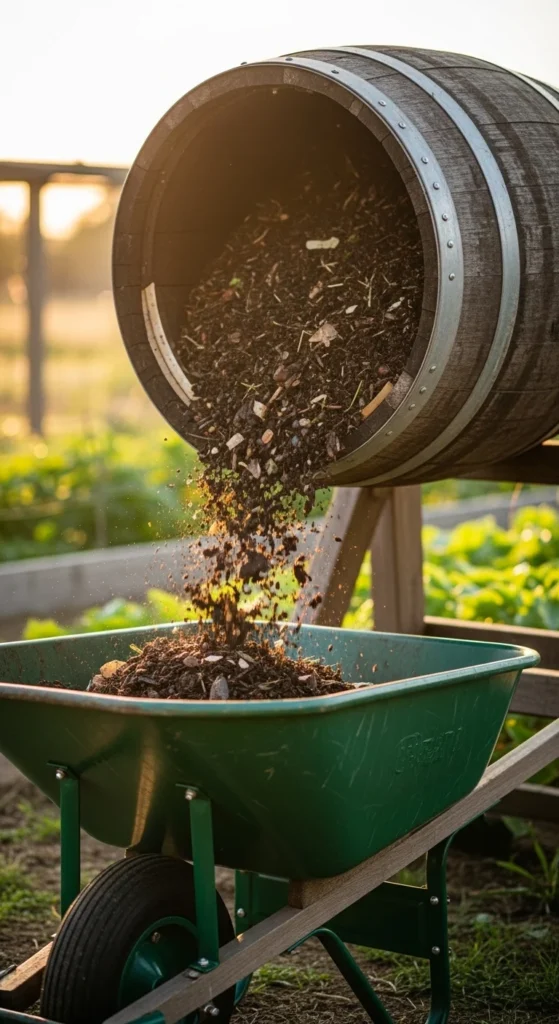
This idea saves your back. You set the tumbler so finished compost dumps straight into a wheelbarrow.
Setup:
- Build a stand tall enough for a wheelbarrow.
- Use a barrel with a wide access door.
- Add a stop block so the barrel doesn’t spin past the dump point.
Budget-friendly tip: use cinder blocks as the stand base, then add two boards as rails.
How it helps:
- No shoveling from ground level
- Easy to move compost to beds
- Cleaner work area
Use it when you want compost often for containers and raised beds. Keep a small tarp nearby for quick cleanup. This is also a good option for people who compost year-round and want less lifting.
8. Straw Bale Instant Compost Walls
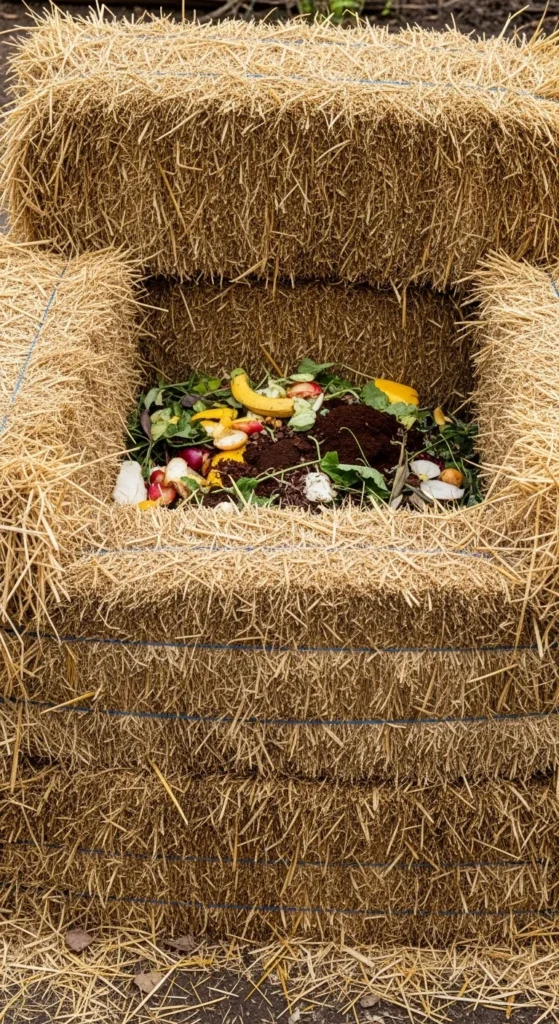
If you want a zero-tool build, straw bales act like compost bin walls. You stack them like blocks and start filling.
How to do it:
- Make a square or U-shape with bales.
- Leave one side lower as an access point.
- Add scraps and yard waste in the center.
Budget-friendly tip: buy bales at end-of-season when prices drop.
Why it works:
- Straw breathes, so airflow is solid.
- Bales slowly break down too.
- The bin looks rustic and blends into garden spaces.
Keep the pile slightly damp. If the straw dries out, the center can stall. When the season ends, you can spread partly broken bales as mulch around beds.
9. Cinder Block “Permanent” Compost Bin
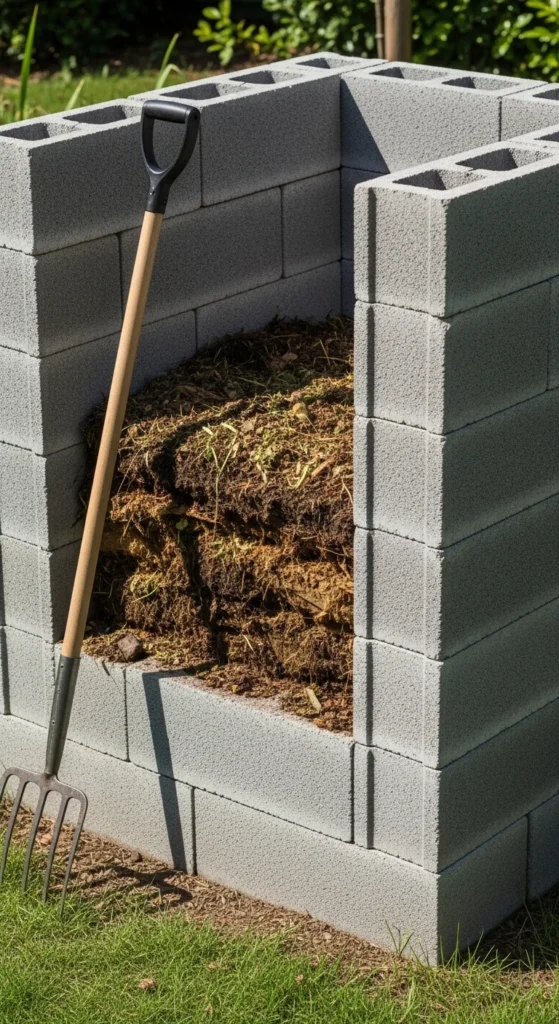
Cinder blocks create a long-lasting compost area that looks tidy. It’s a good choice if you want a fixed compost corner.
Build options:
- Make a three-sided U-shape.
- Leave the front open for easy turning.
- Stack blocks without mortar so you can adjust later.
Budget-friendly tip: check local listings for leftover blocks.
Easy upgrades:
- Add a wood “gate” across the front
- Add a simple lid frame with mesh
- Make two bays by adding a middle wall
This design holds heat well, which helps breakdown. Keep the bin on bare soil for drainage. If you’re worried about rodents, line the bottom perimeter with hardware cloth before stacking blocks.
10. Galvanized Metal “Modern” Bin
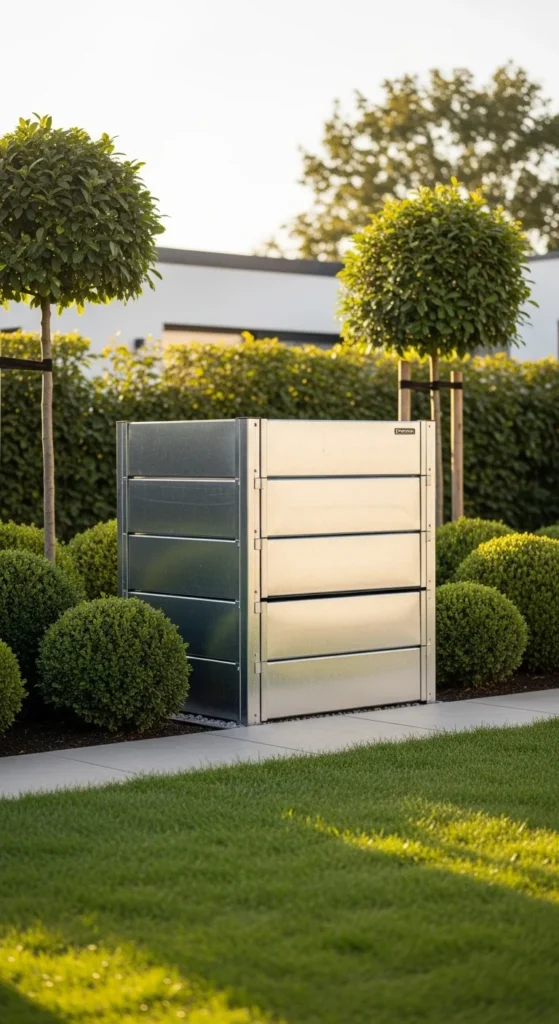
If you hate the look of pallets and wire, metal panels look clean and stay strong. They also discourage chewing pests.
Simple approach:
- Build a basic wood frame.
- Screw galvanized panels to the sides.
- Leave small gaps or add vent holes.
Budget-friendly tip: use roofing panels or scrap metal sheets.
Make it practical:
- Add a front panel that lifts out
- Add a lid to keep heavy rain out
- Keep it in shade so it doesn’t dry too fast
This bin pairs well with a neat garden style. Keep browns stored in a covered bin nearby so adding scraps stays quick and tidy.
11. Reclaimed Wood Slat Bin
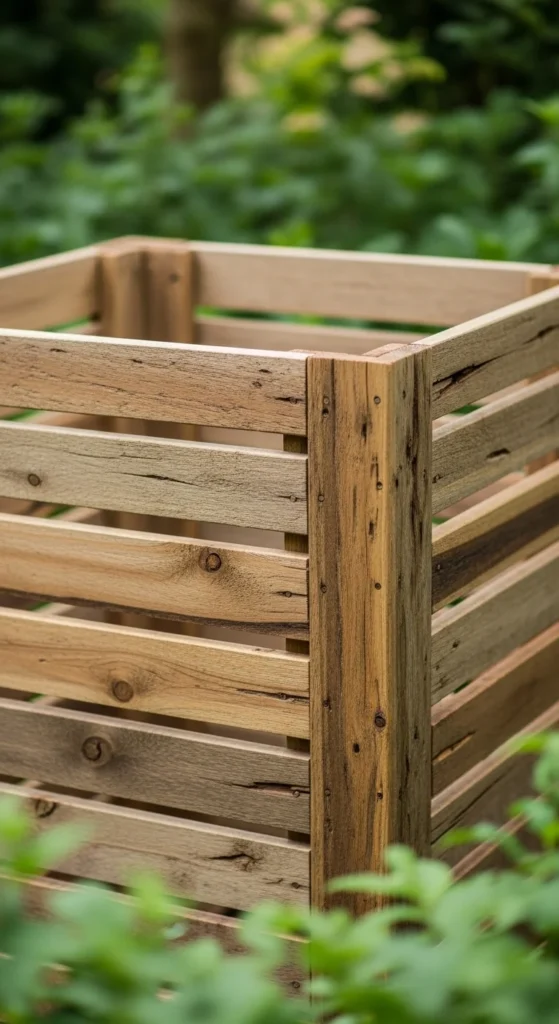
This is a polished version of a pallet bin. You use reclaimed boards or fence pickets and leave small gaps for airflow.
Build basics:
- Make four corner posts.
- Screw slats horizontally with small spaces between.
- Add a removable front slat system.
Budget-friendly tip: old fencing and deck boards often work fine.
Why it’s popular:
- Custom size for your yard
- Better fit and finish than random pallets
- Easy to match garden aesthetics
Add a simple hinged lid if you get heavy rain. It prevents soggy compost and keeps the pile from turning into mud.
12. Heavy Mesh Expandable “Geo” Bin (DIY Version)
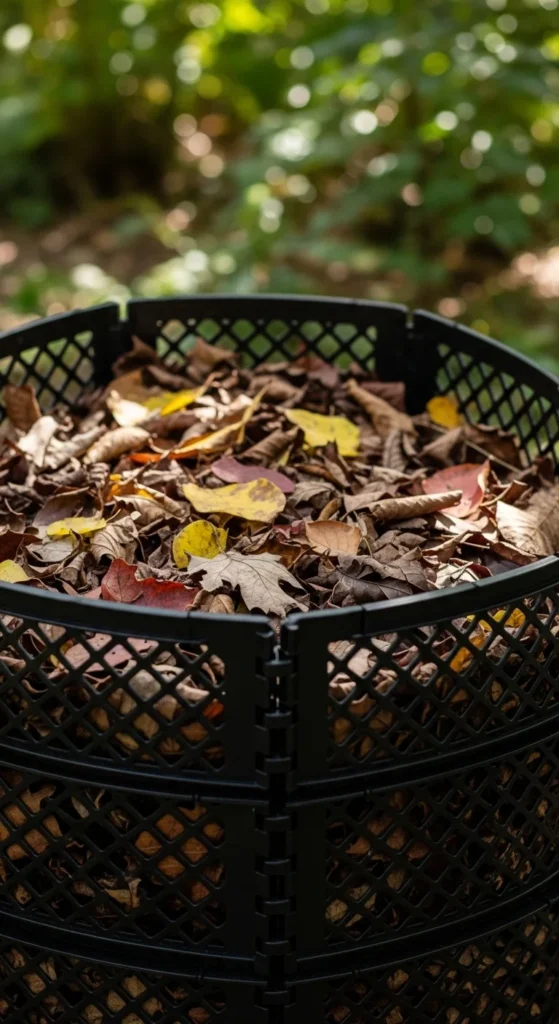
You can copy the popular expandable compost bins using a roll of heavy mesh. It stores flat, then forms a tall circle.
How to make it:
- Cut a length of heavy mesh.
- Form a cylinder.
- Clip the ends together with hooks or wire.
Budget-friendly tip: buy mesh once and adjust size as you learn what volume you generate.
Best use:
- Leaf-heavy yards
- Big seasonal cleanups
- Slow compost that breaks down over time
This bin is also great for leaf mold. If you mainly compost leaves, keep it moist and let it sit. You’ll get a dark soil-like material that’s great for container mixes.
13. Stackable Wooden Crate Bin
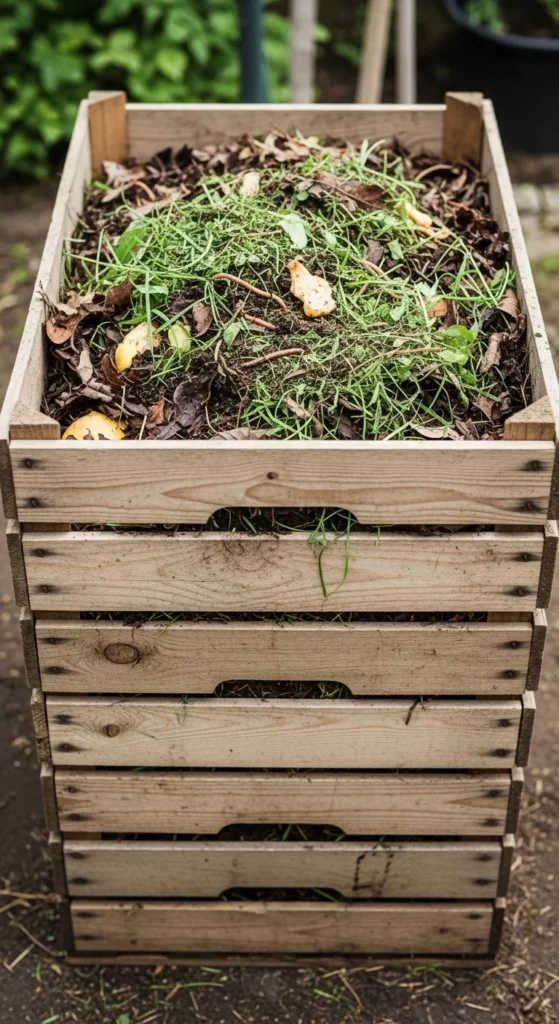
Crates create built-in airflow and a tidy grid look. You can stack them to change height as your pile grows.
How it works:
- Stack 3–5 crates into a tower
- Tie or screw them together at corners
- Leave one crate loose as a “door” for access
Budget-friendly tip: ask produce markets for sturdy crates.
Use tips:
- Put browns at the bottom to start
- Keep kitchen scraps in the center
- Turn by pulling one crate off, mixing, and re-stacking
This is best for smaller households or patio composting where you want a compact footprint.
14. Plastic Tote Compost Bin for Small Yards
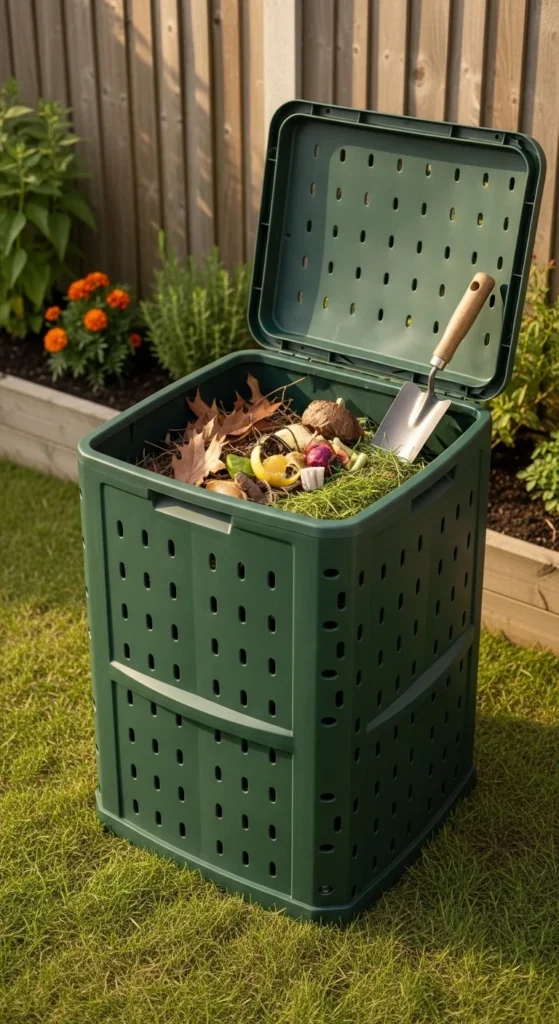
A storage tote can work as a compact compost bin if you add airflow and drainage.
Quick setup:
- Drill holes along sides and lid
- Drill a few holes in the bottom
- Raise it on bricks for drainage
Budget-friendly tip: use a tote you already own.
How to keep it from going slimy:
- Add extra browns
- Stir with a hand cultivator
- Keep it slightly damp, not wet
This is a good “starter bin” while you figure out how much compost you actually make each week.
15. Indoor Vermicompost Bucket (Worm Starter)
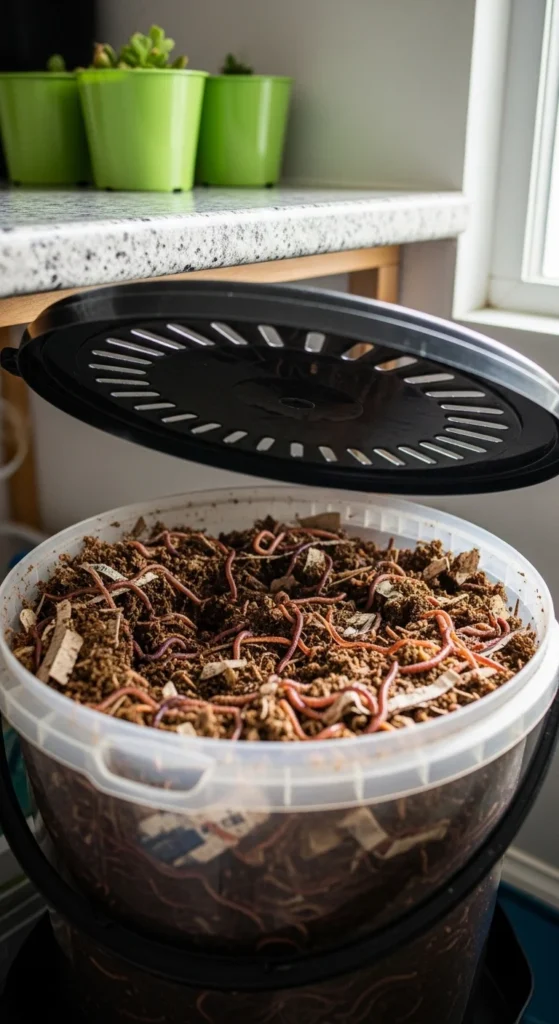
If you live in an apartment or want a clean indoor option, a worm bucket handles kitchen scraps well.
Basic setup:
- Bucket with air holes
- Bedding: shredded paper + damp cardboard
- Red worms (worm composting type)
- A tray underneath to catch drips
Budget-friendly tip: start small. A simple bin works before you buy a bigger system.
Use routine:
- Add scraps in small amounts
- Cover with bedding
- Keep the bin out of harsh heat
Worm compost is rich and great for container plants. This option also avoids outdoor pests completely.
16. Corner Pallet + Mesh Hybrid Bin
This hybrid keeps the pallet look but adds mesh where you want airflow and pest control.
How to build:
- Use pallets for two sides in a corner
- Use hardware cloth for the front and remaining side
- Add a simple latch so the front opens
Budget-friendly tip: build it in an existing corner so you use fewer materials.
Why it’s useful:
- Less wood cutting
- Strong airflow
- Easy front access for turning
This design works well when you want a bigger pile but don’t want a full three-bin build yet.
17. Woven Branch “Garden Art” Bin
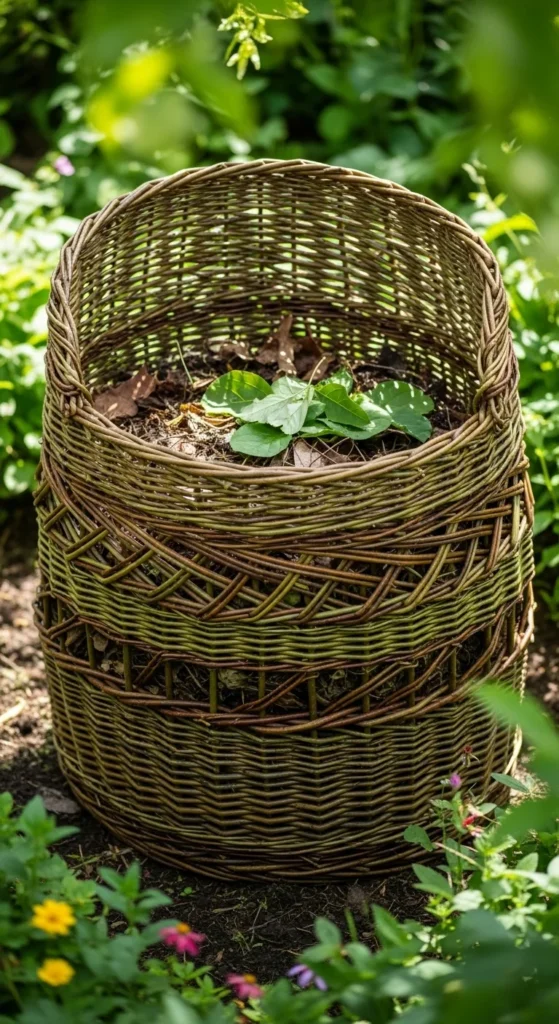
If you want composting to look decorative, a woven branch bin blends into cottage-style gardens.
How it works:
- Drive sturdy stakes into the ground
- Weave flexible branches around the stakes
- Leave a small opening as an access point
Budget-friendly tip: use pruned branches from your yard.
Practical notes:
- This is best for leaves and garden waste
- Add kitchen scraps only if you cover with browns
- Keep it in a shaded spot so it doesn’t dry out
It’s not the fastest compost method, but it looks great and still turns waste into usable compost over time.
18. Metal Can “Rodent-Resistant” Bin
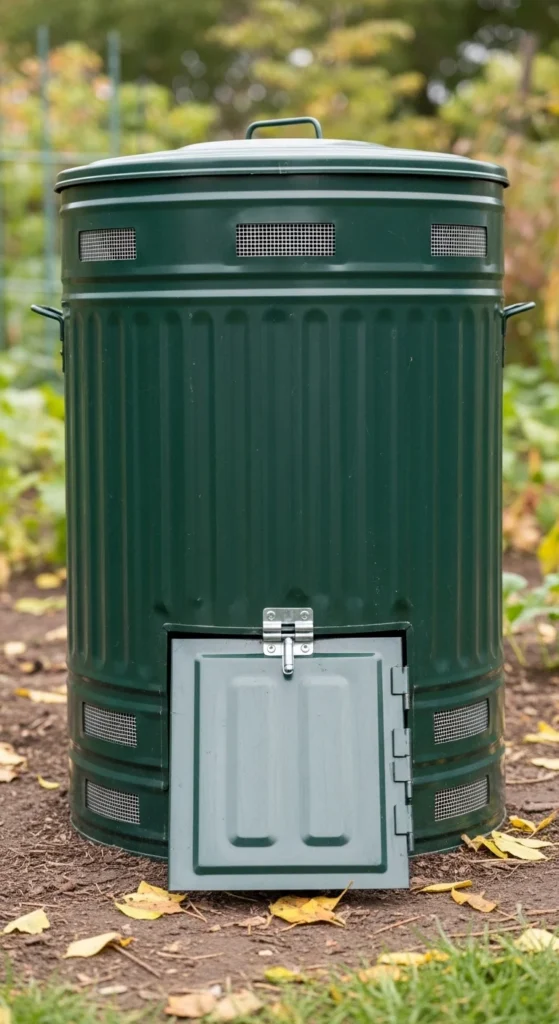
A metal can bin helps when rodents are a common issue. It’s also tidy and compact.
Setup:
- Drill ventilation holes
- Add screened vents using hardware cloth
- Cut a small side hatch for easy stirring (optional)
Budget-friendly tip: buy a used metal can and clean it well.
How to use:
- Keep scraps covered with browns
- Stir with a stick or small cultivator
- Place on bricks so it drains
This is best for small batches. It keeps composting easy without attracting unwanted guests.
19. “Aerated Pipe” Fast Pile Bin
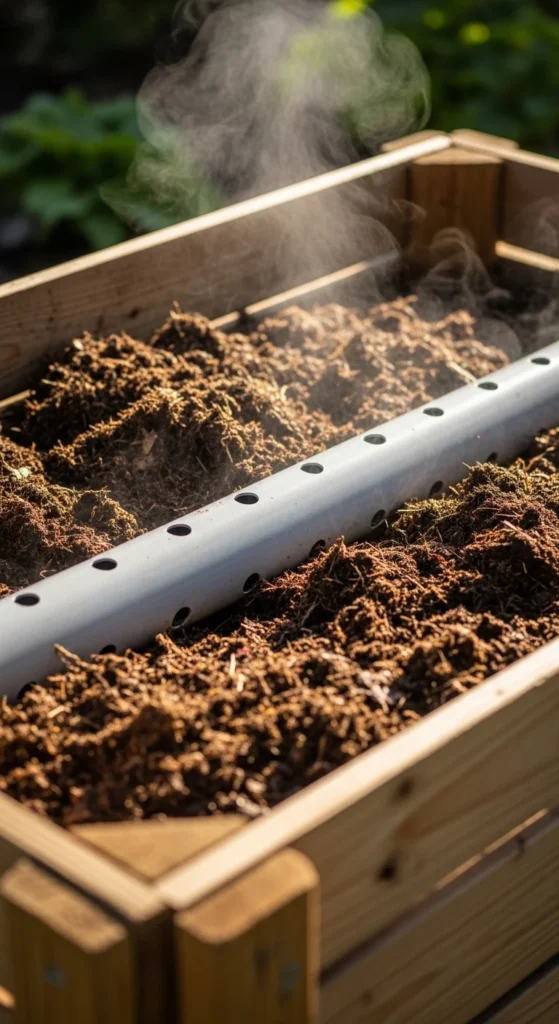
If you want faster breakdown without constant turning, add an aeration pipe through the pile.
How to do it:
- Drill many holes in a PVC pipe
- Set the pipe vertically in the center
- Build compost layers around it
Budget-friendly tip: use scrap PVC from home projects.
Helpful habits:
- Keep a good mix of greens and browns
- Water lightly when the pile looks dry
- Turn occasionally, but less often than normal piles
This works well inside a wire circle or slat bin. Air movement helps the pile stay active with less effort.
20. Rolling Compost Cart for Patios
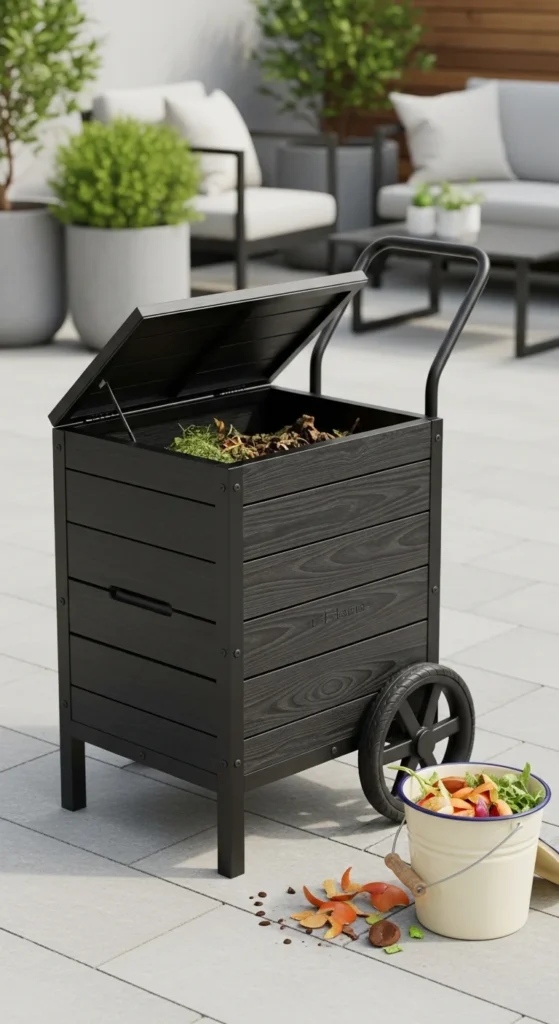
For patios and small yards, a rolling bin keeps composting close to the kitchen and easy to move.
How to set it up:
- Use a lidded bin or tote
- Drill ventilation holes
- Mount it on a small dolly or casters
Budget-friendly tip: repurpose a rolling storage cart.
Why it’s useful:
- Move it into shade during heat
- Roll it away for gatherings
- Keep it near a water source for quick moisture checks
This option helps people who compost in small spaces where a big pile would look messy.
21. Rain-Smart Lid Add-On for Any Bin

Too much rain turns compost soggy and slow. A simple lid makes almost any bin work better.
Easy lid ideas:
- Scrap plywood with a hinge
- Wood frame with hardware cloth
- Tarp stretched over a lightweight frame
Budget-friendly tip: use an old shower curtain liner under a tarp for extra water resistance.
Keep airflow:
- Don’t seal the bin airtight
- Leave side gaps or mesh vents
This add-on is perfect for pallet bins, wire circles, and slat bins. It keeps moisture steady and reduces the “mud pile” problem.
22. Critter-Proof Hardware Cloth Base
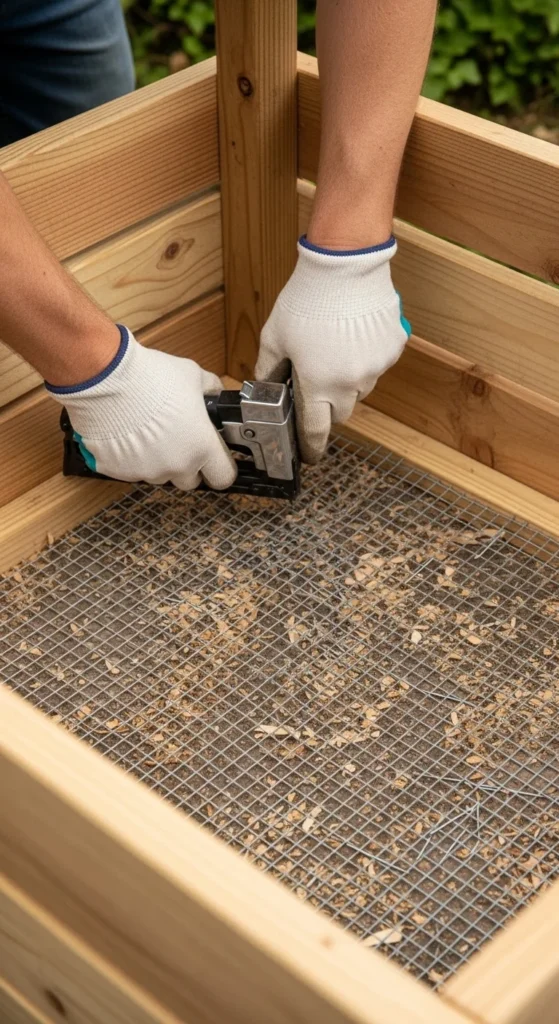
If pests dig in from below, add a hardware cloth base. It keeps airflow while blocking entry.
How to add it:
- Lay hardware cloth on the ground
- Staple it to the bin frame or weigh it with bricks
- Build the bin on top
Budget-friendly tip: use hardware cloth only on the bottom and lower sides to save material.
Extra protection:
- Keep food scraps buried in the center
- Cover with browns every time
- Avoid meat, dairy, and oily foods
This upgrade works with pallet bins, slat bins, and even cinder block bins if you line the base first.
23. Compost Station With a “Browns Bin” (The Secret Weapon)
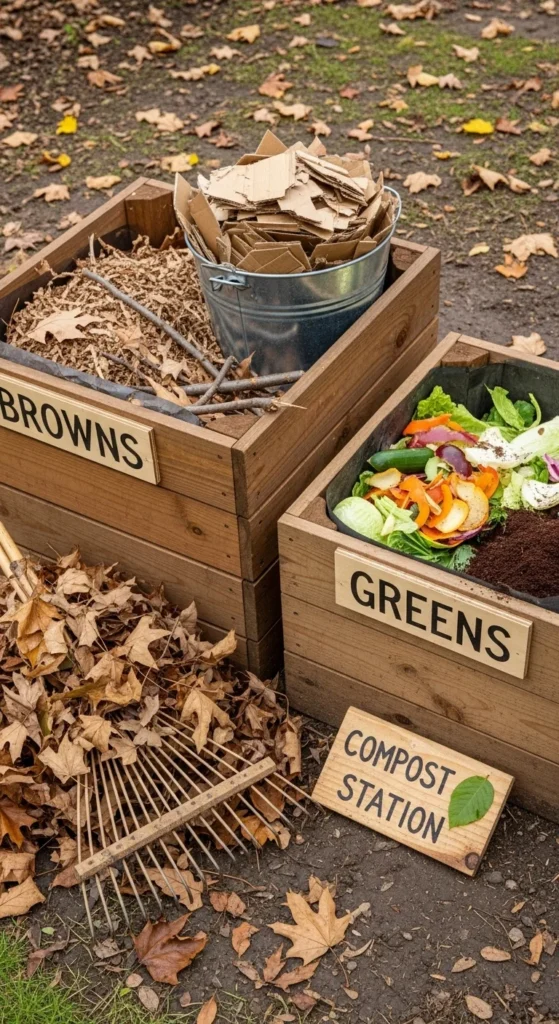
This isn’t a bin style by itself, but it fixes the #1 reason compost fails: too many wet scraps and not enough dry material.
Set up a simple station:
- One container for dry leaves
- One bag of shredded cardboard
- One small pail for kitchen scraps
Budget-friendly tip: shred delivery boxes and paper bags. Free browns add up fast.
How to use it:
- Every time you add kitchen scraps, add a matching handful of browns
- If the pile smells, add more browns and turn
- If the pile looks dry and dusty, add a little water
A compost station makes any DIY bin work better—pallet, wire, tumbler, or tote. It also keeps the process clean and repeatable.
Conclusion
The best DIY compost bin is the one you’ll actually use every week. If you want steady output, build a pallet three-bin system. If you want speed with less lifting, go with a tumbler or barrel setup. If you want cheap and fast, a wire circle or straw bale bin gets you composting today. Pick one design, add a simple “browns bin” next to it, and you’ll turn scraps into dark, crumbly compost that feeds raised beds and containers all season long.

Leave a Reply