
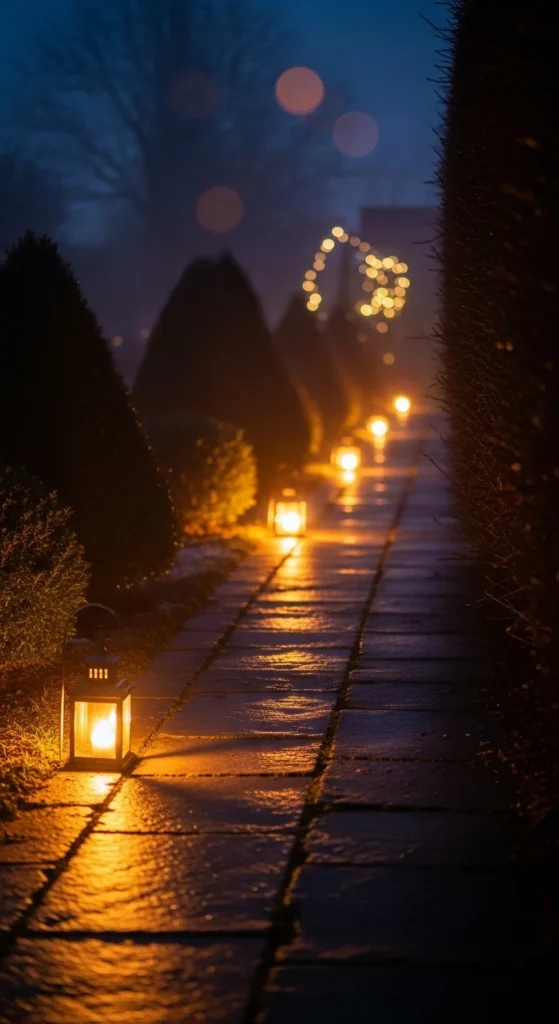
Lantern paths change how a garden feels after sunset. Light marks every step, frames planting beds, and sets a calm rhythm for New Year evenings. You can craft atmosphere with simple materials: jars, metal frames, solar stakes, tea lights, and reclaimed wood. Start small. Add pieces in groups. Keep wiring tidy and safe. Mix heights for depth. These ideas focus on clear layouts, quick DIYs, and budget-smart details that guide mood without crowding the walkway.
1. Frosted Mason-Jar Runway
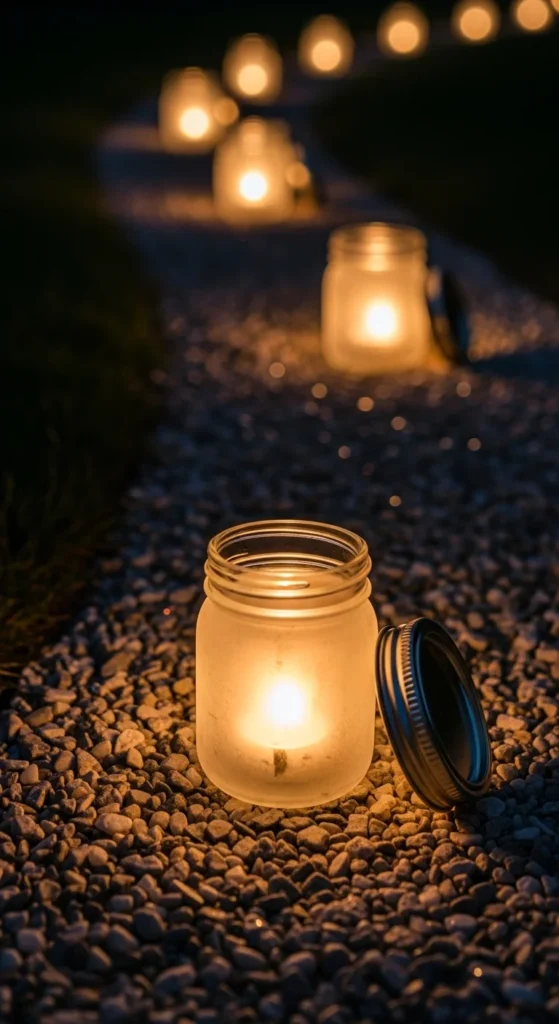
Frosted jars give a soft glow that hugs the path. Use matte glass spray or diluted white glue with a little salt for texture. Drop a tea light or a small LED inside. Set jars on flat stones so they stay level. Keep spacing even, about a stride apart. For fast setup, place three jars at each bend to signal direction. Reuse pasta jars to cut costs. Add pea gravel inside each jar to anchor candles on breezy nights. If you want a quick seasonal switch, wrap a thin wire of warm micro-LEDs around the jar neck and hide the battery under the lid. Store extras in a crate near the door, ready for last-minute gatherings. Wipe glass with vinegar to keep it clear between uses.
2. Shepherd-Hook Hanging Line
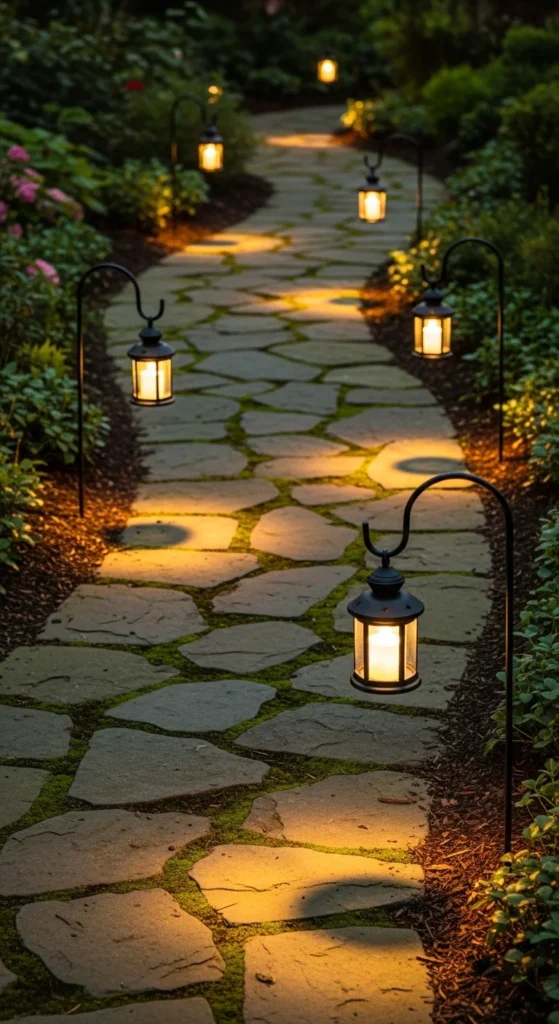
Shepherd hooks create height without blocking movement. Push them into soil on both sides of the walkway. Hang small metal lanterns with LED candles to keep flames away from plants. Keep hooks at the same height for a clean line. If your soil is loose, drive short rebar stakes first, then slide the tubes over. Paint hooks with rust-resistant spray to extend life. For a budget build, repurpose kitchen S-hooks and thrifted lanterns. Add one higher accent hook at the start of the path as a visual cue. On windy nights, tuck a flat pebble inside each lantern to stop sway. The result looks tidy, warm, and easy to scale up as your garden grows.
3. Recessed Paver Glow

Shallow cups in stone or concrete make light feel embedded. Use pavers with pre-cast recesses, or drill shallow holes with a masonry bit. Drop in glass votives or low LED pucks. The beam washes sideways and highlights texture. Keep units flush with the walking surface so shoes won’t catch. Mark wiring routes with chalk before you start. If using candles, add a thin layer of sand in each recess to stabilize the flame. For low upkeep, pick USB-rechargeable pucks and rotate charging weekly. Edge the run with small river stones to catch wax drips. The pathway reads calm and architectural without tall fixtures.
4. Lanterns in Timber Edging
Turn the border itself into lighting. Cut square niches in a treated timber edging strip and slip in compact lanterns. Space them evenly so light overlaps. Seal cut faces to resist moisture. If you use battery LEDs, label sets A/B and swap weekly to keep brightness even. For a DIY frame, staple aluminum flashing behind each niche to reflect light forward. Add clear acrylic fronts to block splashes. This approach saves floor space while keeping the line straight and readable.
5. Every-Other-Riser Step Lights

Stairs feel safe and inviting when light breaks across risers. Place lanterns on alternating steps to avoid clutter. Choose sturdy bases so nothing tips under foot traffic. If candles are your pick, use tall glass chimneys to guard the flame. For LEDs, choose warm color temps around 2700–3000K for a calm tone. Add anti-slip tape on the step edges to keep the look practical. Rotate lantern positions for parties to refresh the pattern without new hardware.
6. Hedge-Kiss Shadow Casting
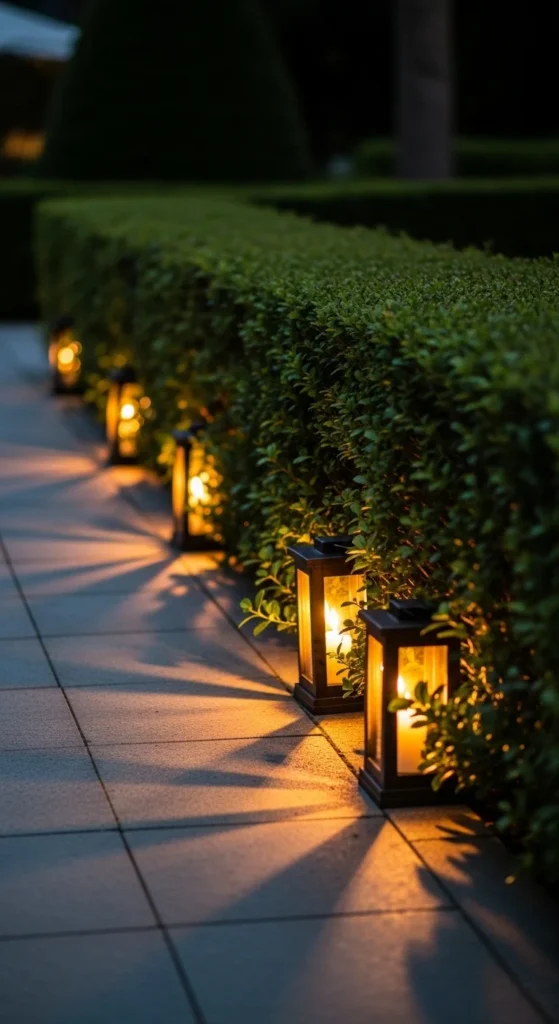
Place squat lanterns just inside the hedge line. Light travels through leaves and creates soft patterns on the path. Keep fixtures low, about knee height, so beams graze foliage. Use the same model of lantern for a clean rhythm. Tuck extra batteries in a nearby storage bench. If rain is common, select IP-rated housings or slip-on silicone caps. Trim stray branches that block light cones. The shadow texture adds depth without bright hotspots.
7. Mirror-Tile Echo Highlights

Reflections extend light without more fixtures. Set small mirror tiles at a shallow angle along the border, facing each lantern. Use exterior-grade adhesive and seal the edges. The reflected glow doubles perceived brightness. If you want a softer look, use brushed steel rectangles instead. Keep mirrors narrow so they disappear by day. Wipe them with a microfiber cloth when dust builds. This trick is inexpensive and useful for long runs.
8. Bamboo Stake Lantern Row
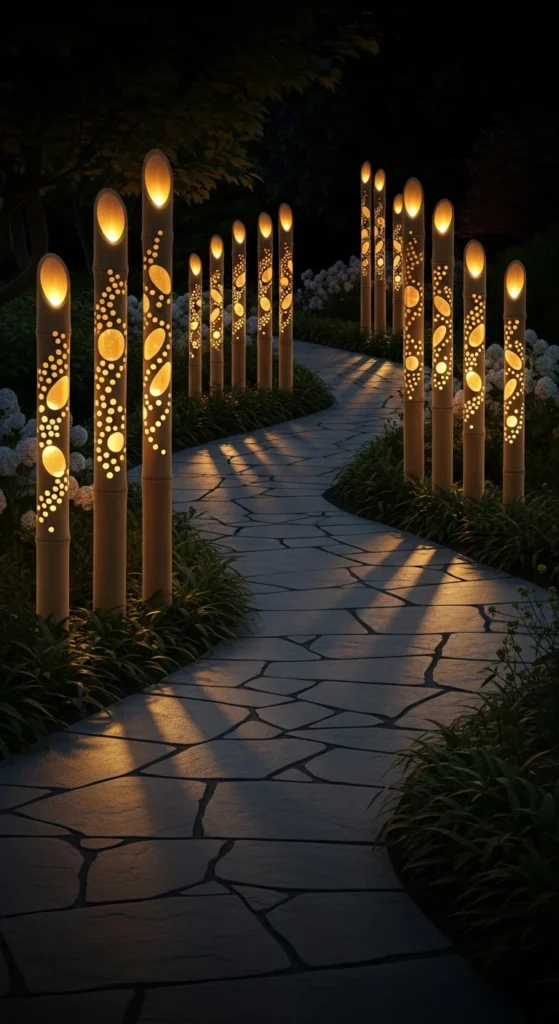
Bamboo is light, strong, and easy to modify. Cut lengths to calf height and drill small “windows.” Slide a weather-safe LED candle inside each culm, using a wood plug as a base. Push the stakes along the path edge, keeping spacing consistent. The glow peeks through the windows and adds a calm, natural vibe. Seal cut ends to slow weathering. Replace any dim unit fast to keep the rhythm even along the curve.
9. Hurricane on Log-Slice Pedestals
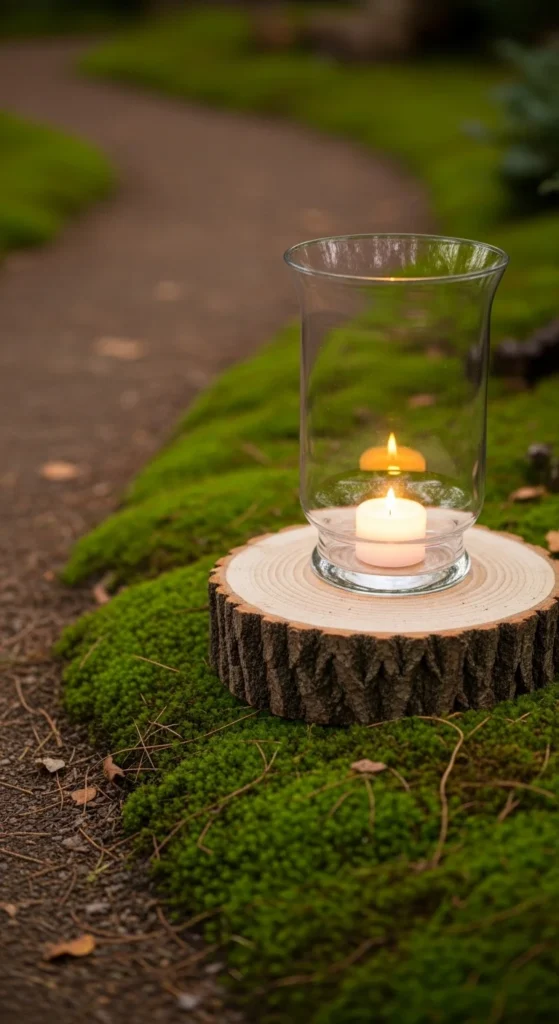
Raise light slightly for better spread. Place log slices on level soil and top each with a hurricane lantern. The clear cylinder protects flame or LED from wind. Vary heights to guide the eye around corners. Treat wood with exterior oil so it lasts. For a low-cost option, use concrete pavers instead of timber. Store hurricanes in a crate when not in use. The look is cozy and works across gravel, bark, or stone.
10. Minimal Frame March
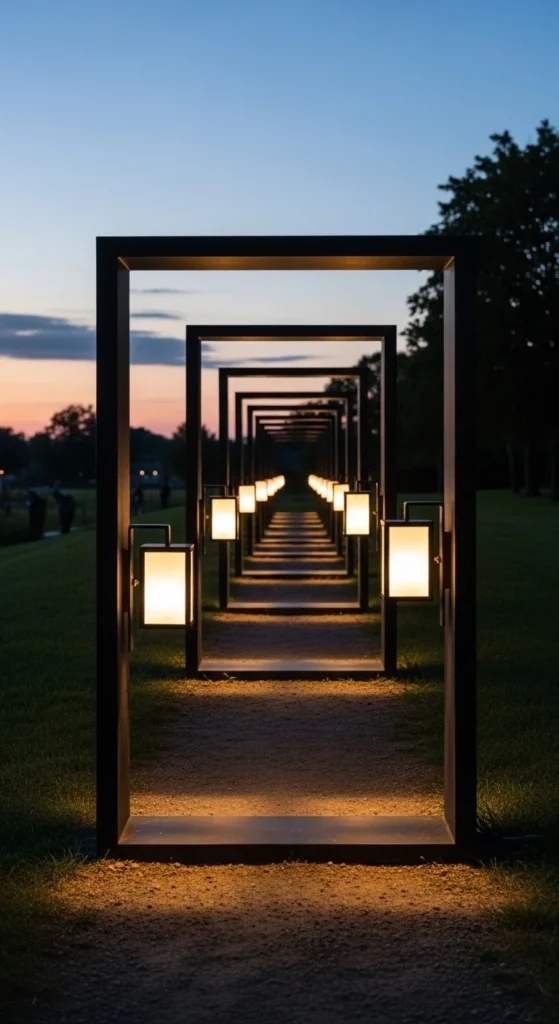
Simple metal frames keep lines crisp. Think small square hoops anchored into soil with ground spikes. Clip cube lanterns to the inside edge so the light washes inward. Keep the top rails level using a string line. For a quick DIY, bend rebar into rectangles and spray it matte black. Cable-tie the lanterns and snip excess. This style pairs well with modern paving and low, tidy planting.
11. River-Stone Nests
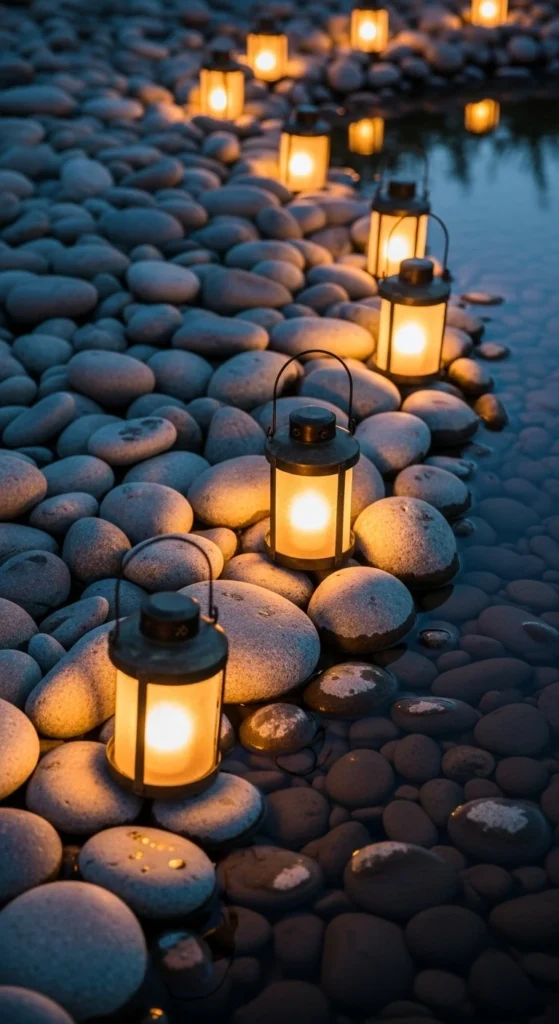
Nestle small lanterns into gaps between smooth stones. The rock shapes bounce light and hide hardware. Build shallow pockets using landscaping adhesive so each lantern sits snugly. Add a small drain hole under each pocket to prevent puddles. Choose warm LEDs for a gentle tone. Spread fine gravel around the nests to keep weeds down. The path glows like a stream of embers, perfect for slow evening walks.
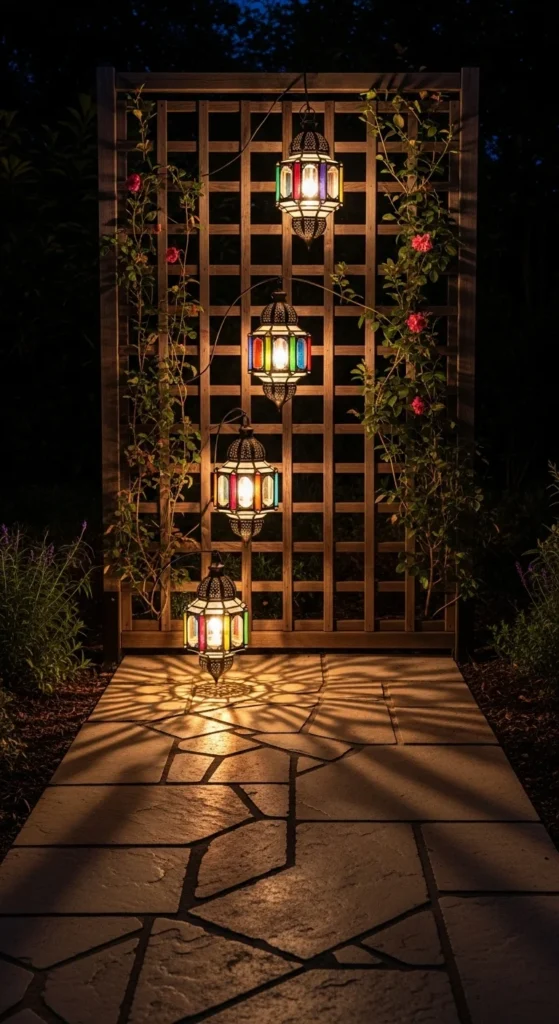
12. Lantern Cluster Gateposts
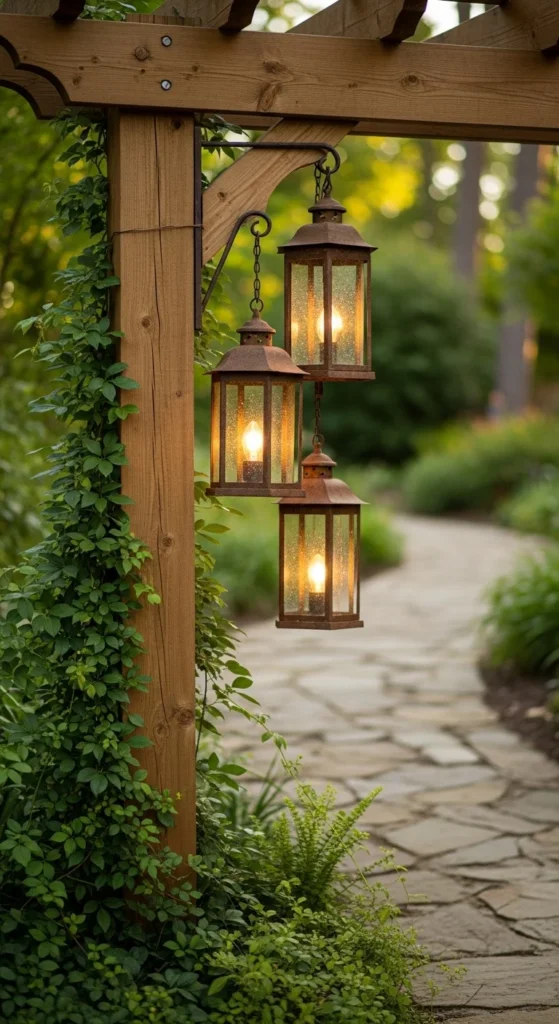
Mark entries with clusters of three at staggered heights. Mount short brackets on pergola posts or fence uprights. Hang lanterns from each bracket so light overlaps on the step below. Keep the lowest unit near eye level for a welcoming beam. Repeat the cluster at the far end of the path to pull guests forward. For quick swaps, use carabiners on each handle. The cluster reads as a simple landmark without heavy wiring.
13. Ladder-Rung Lantern Rail
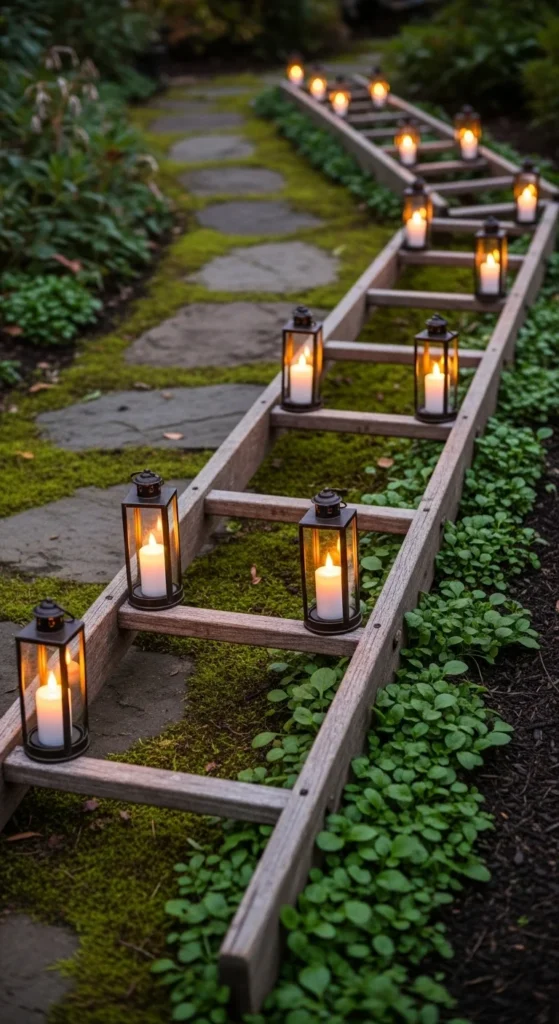
A weathered ladder becomes a ready-made rail. Lay it parallel to the path and secure it with U-stakes. Place narrow lanterns within the rungs so light looks caged. Seal the timber to resist moisture. For a brighter look, line the inner rung with reflective foil tape. Swap lanterns for micro-LED strings on busy nights. The ladder keeps lines straight, especially handy on loose gravel edges.
14. Slot-Bollard Lanterns
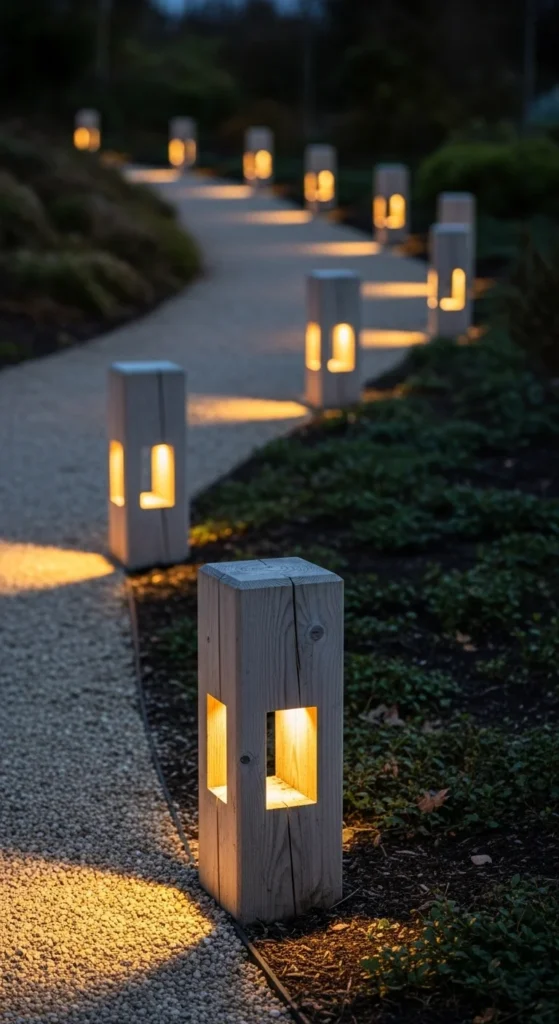
Build low bollards from 4×4 offcuts. Cut a vertical slot in each and fit a small LED inside, facing the path. Cap the top to keep rain off. Paint the wood in a dark tone so the slot glow stands out. Set bollards at even intervals. For a softer beam, line the slot with parchment acrylic. You get a durable, low-glare run that’s easy to maintain.
15. Citrus-Glow Jar Line
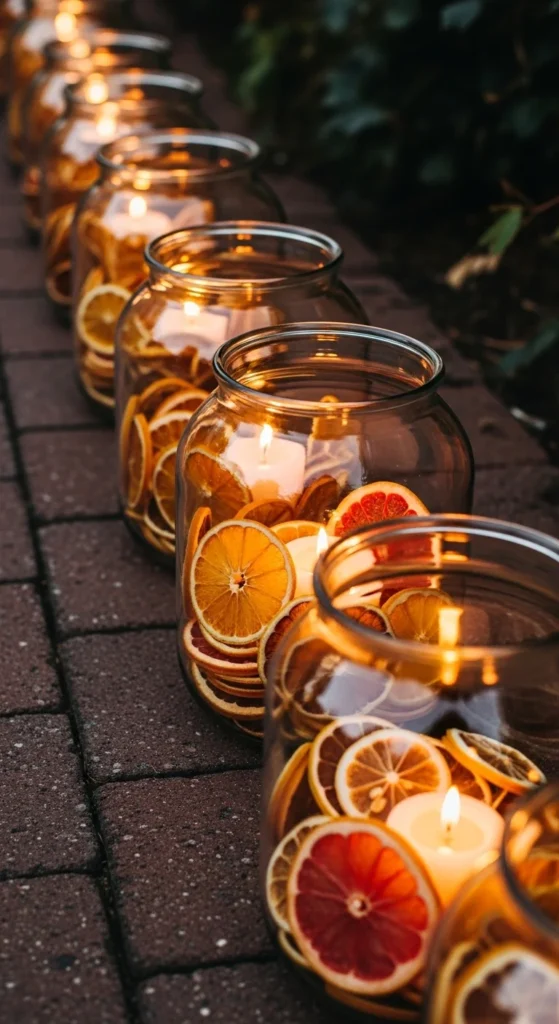
Use dried orange or lemon slices in wide jars to tint the light amber. Layer slices around the inner wall, then add a candle or LED. The color reads warm and festive. Place jars on bricks to keep them level. For windy nights, use lidded lantern jars with vent holes. Replace slices every few weeks so they stay bright. It’s a quick seasonal tweak that costs very little.
16. Punched-Tin Watering-Can Lanterns

Turn old watering cans into patterned lamps. Punch small holes in star or leaf shapes, then place a light source inside. Angle the cans toward the path so patterns scatter forward. Add a stake through the handle to stop tipping. A short run of three looks playful at a bend. Spray a clear coat to slow rust. The perforations throw lively speckles without overwhelming the walkway.
17. Low Pagoda Markers
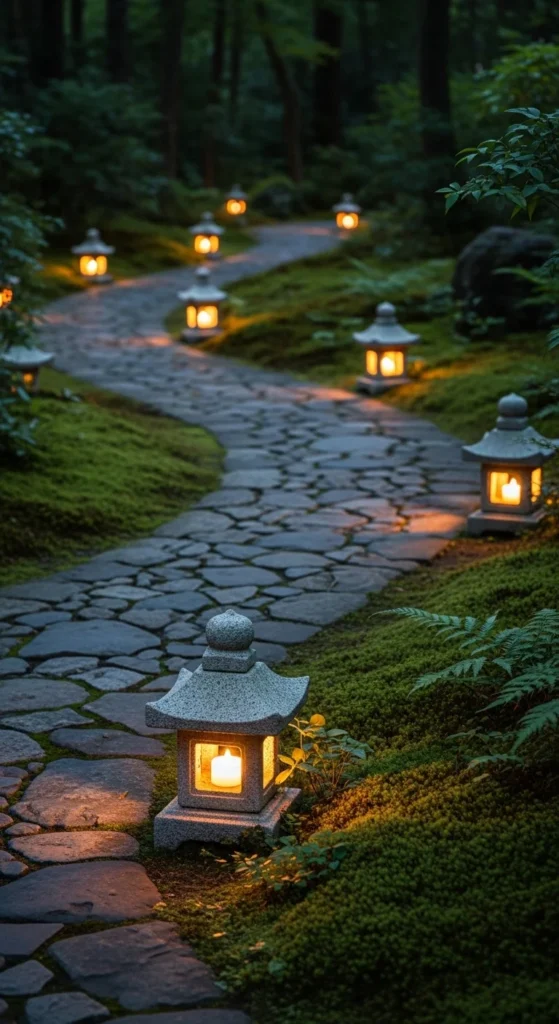
Small pagoda lanterns give a calm, sculptural line. Set them low so light hugs the ground. Space tighter on curves to keep the edge readable. Use LEDs to avoid heat buildup inside stone cavities. Brush debris from vents so air flows. A short strip of moss between units softens gaps. This layout pairs well with gravel, stepping stones, and evergreen shrubs.
18. Railing Micro-LEDs with Clip-Ons
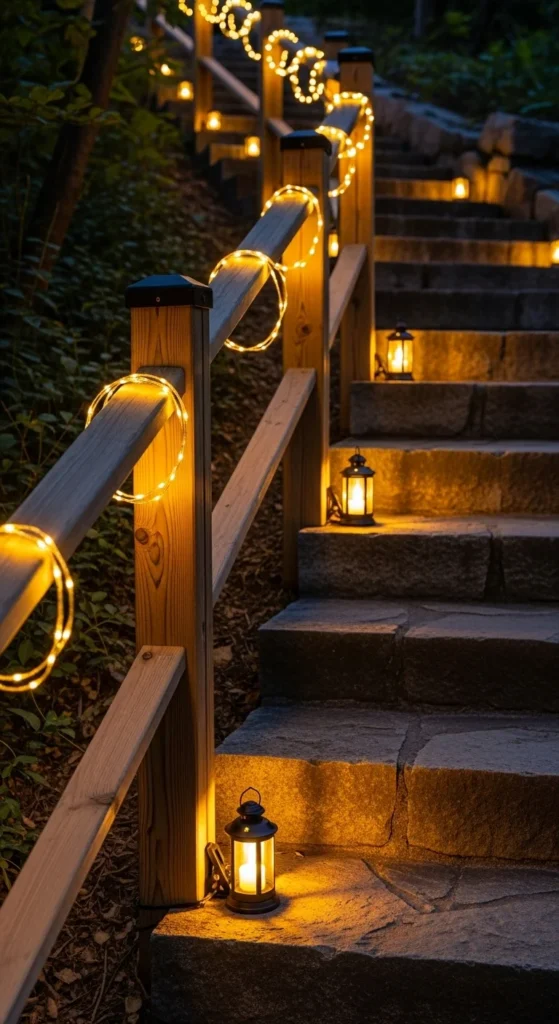
If your path has a handrail, let it do double duty. Wrap a micro-LED strand along the inner side and add clip-on mini lanterns every arm’s length. Keep wires on the underside to stay out of sight. Choose a warm hue so the light feels gentle. Recharge weekly if using USB packs. This setup helps guests keep balance and adds a consistent rhythm up or down the steps.
19. Floating-Lantern Rill Edge
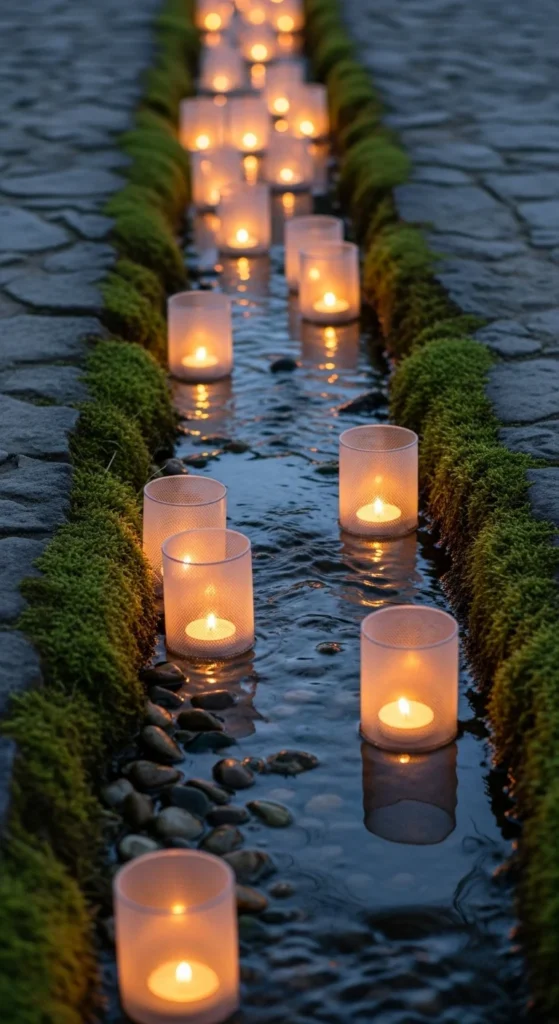
Water doubles the drama with reflections. If you have a narrow rill or shallow trough, float tealight boats made from metal tins with small cork rings. Add a fine mesh barrier at each end to keep them in place. Light dances on the water and on the path edge. Keep a long lighter handy for quick resets. This idea works best on wind-sheltered nights.
20. Two-Height Trellis Hang
Hanging at two heights creates layers. Fix a trellis panel behind the path and attach hooks at eye level and knee level. Hang matching lanterns so beams cross. The higher row washes foliage; the lower row lights the pavers. Keep spacing even. Use quick-release hooks so you can swap lantern sizes by season. A single dimmer pack for the lower row lets you soften glare near seating.
21. Solar Stakes in Groundcover
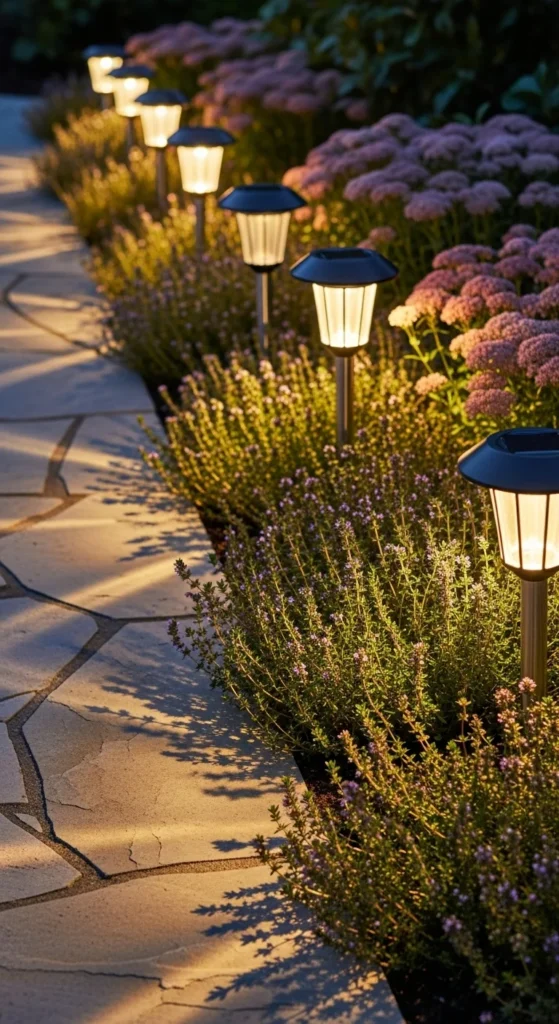
Tuck solar stakes inside low groundcover so the hardware disappears by day. Choose warm white panels and align them to catch sun. Place units close enough that pools overlap. If shade is heavy, rotate a few stakes to charge in a brighter spot, then return them at dusk. Replace rechargeable cells in spring. This method gives a soft line with almost no upkeep.
22. Lantern Arch Finish Line
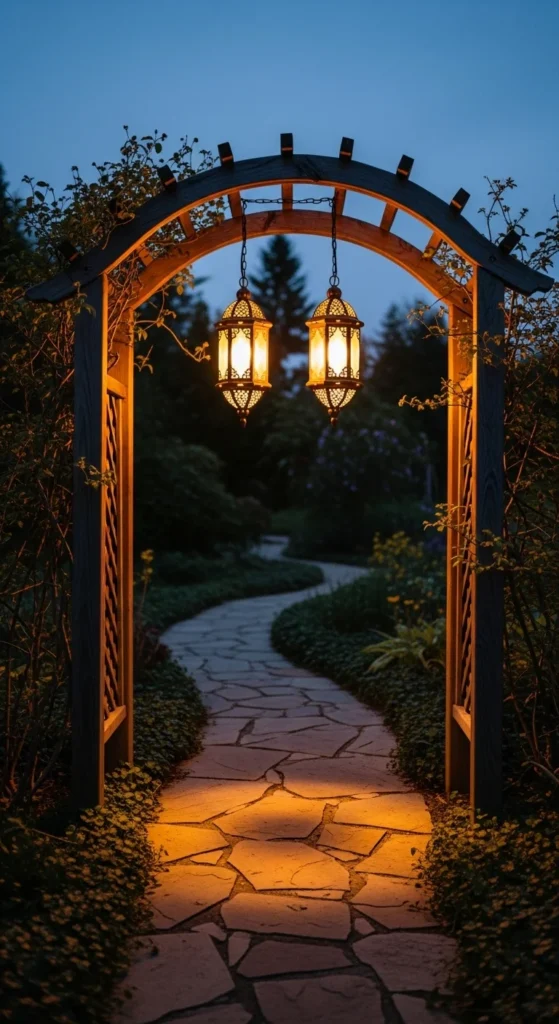
End the path with a light gate. Build a slim arch from conduit or bamboo and anchor both sides with ground spikes. Suspend two lanterns from the center seam at slightly different heights. The paired glow reads like a quiet finish point. Wrap the arch with a thin micro-LED strand for extra sparkle on holidays. Keep the span narrow so it frames the walkway without blocking views beyond.
Conclusion
Lantern paths work best when light is steady, low-glare, and easy to maintain. Start with a simple run, match color temperature, and space pieces evenly so pools overlap. Mix one height detail with one ground detail for depth. Use rechargeable LEDs, rust-safe finishes, and weather-ready housings to keep costs down. Pick one idea from this list, lay out your first five fixtures, and enjoy calm New Year nights guided by a warm, welcoming path.

Leave a Reply