
Growing vegetables doesn’t have to mean big garden beds, expensive irrigation systems, or daily watering routines. A self-watering bucket garden is one of the easiest DIY gardening hacks—perfect for balconies, patios, and small backyards.
This simple setup uses a bottom water reservoir and wicking system to keep plants hydrated automatically. The result? Less watering, healthier roots, and surprisingly big harvests from just a 5-gallon bucket.
Whether you want to grow tomatoes, peppers, or herbs, this beginner-friendly method can transform any small space into a productive mini garden.

Why Self-Watering Bucket Gardens Work So Well
Traditional container gardening can be tricky. Too much water causes root rot, while too little leaves plants stressed and wilted.
A self-watering system solves both problems.
Instead of watering from the top, plants pull moisture upward from a reservoir at the bottom of the bucket through a wicking system.
Key benefits
- Consistent moisture for healthier roots
- Up to 70% less water usage
- Less evaporation in hot weather
- Refill only once or twice per week
- Perfect for busy or beginner gardeners
Because the top soil layer stays drier, it also helps reduce weeds and fungus problems.
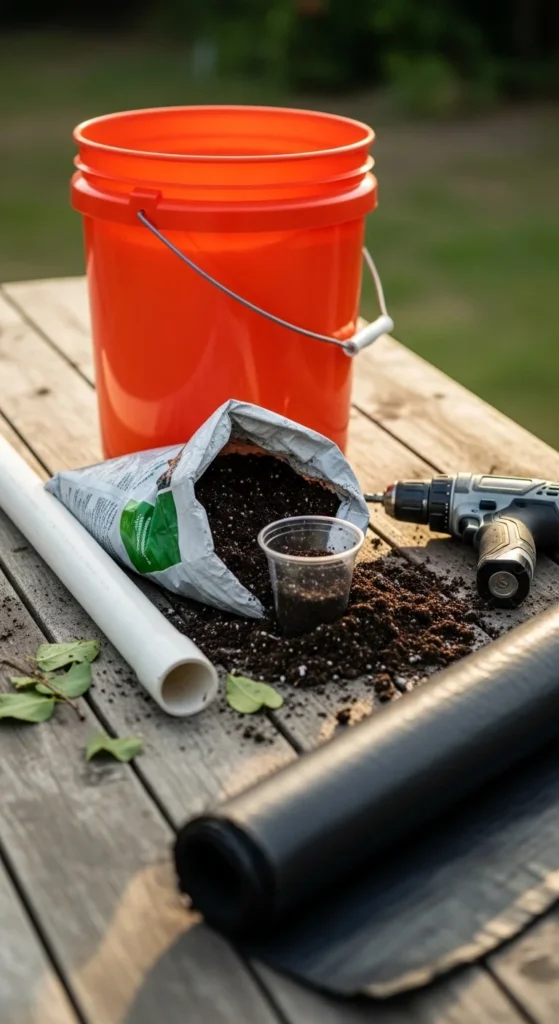
Materials You’ll Need
The beauty of this project is how inexpensive it is. Most materials cost only a few dollars and can even be upcycled.
Basic DIY supplies
- 5-gallon plastic bucket
- Small plastic pot, cup, or colander (for the wick)
- PVC pipe (about 1 inch wide) for watering
- Potting mix (peat-free or vegetable mix works well)
- Landscaping fabric
- Drill or heated nail
- Utility knife
Optional upgrades:
- Perlite for better soil drainage
- Organic fertilizer pellets
- Mulch or straw
Step 1: Create the Water Reservoir
The reservoir is the hidden water storage at the bottom of the bucket.
How to build it
- Drill an overflow hole about 2–3 inches from the bottom of the bucket.
- This prevents the reservoir from filling too high.
- Cut a hole in the bucket base or platform where the wick cup will sit.
This overflow hole is one of the most important parts of the system—it protects plants from overwatering.
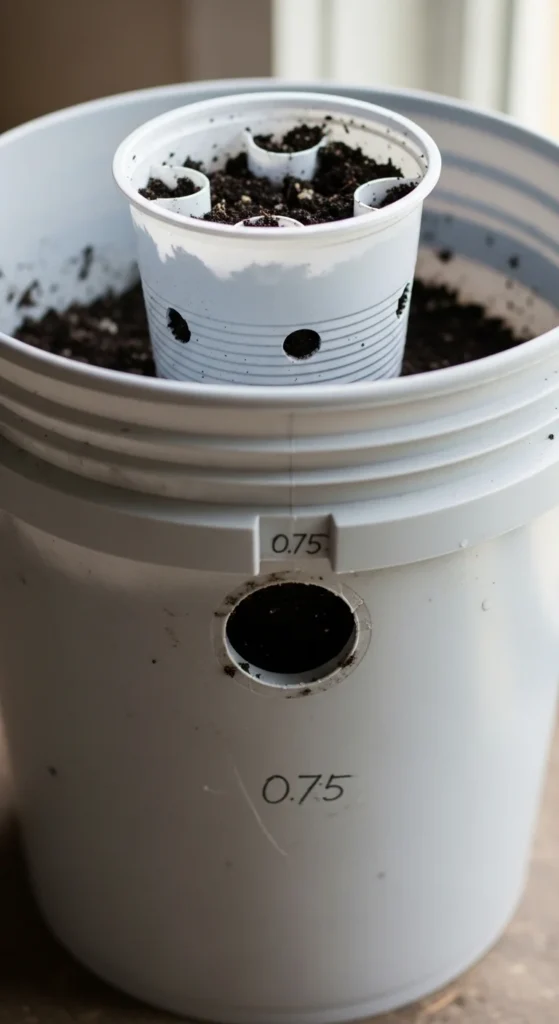
Step 2: Add the Wicking System
The wick is what pulls water upward into the soil.
Most DIY gardeners use:
- A perforated cup
- A small plastic pot
- A colander-style container
How it works
- Fill the cup with potting soil.
- Place it through the hole in the platform.
- The soil inside the cup absorbs water from the reservoir.
That moisture then spreads upward through the rest of the soil.
This process is called capillary action, and it keeps plants evenly watered without daily effort.
Step 3: Install the Water Fill Tube
Instead of pouring water on top of the soil, you’ll fill the reservoir through a pipe.
Setup
- Cut a piece of PVC pipe about 10–12 inches long.
- Angle the bottom slightly so water flows easily.
- Insert it into the bucket so it reaches the reservoir.
Now you can simply pour water down the pipe to refill the system.
This design is especially helpful during hot summer weather when plants need consistent hydration.

Step 4: Add Soil and Plants
Once the structure is ready, it’s time to plant.
Fill the bucket
- Place landscaping fabric over the reservoir platform.
- This prevents soil from clogging the water chamber.
- Add high-quality potting mix.
Then plant your vegetables or herbs.
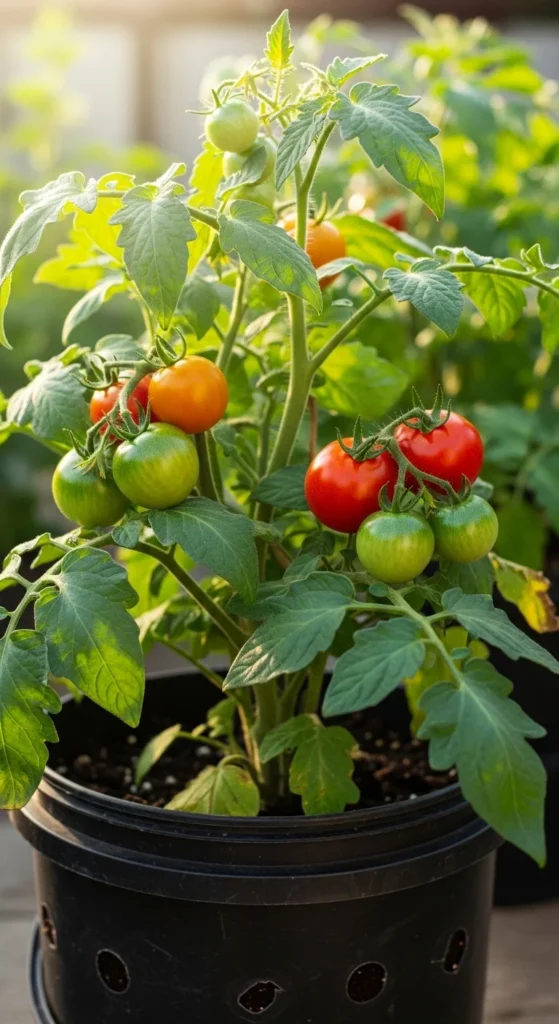
Best plants for bucket gardens
These plants thrive in self-watering containers:
- Tomatoes
- Peppers
- Cucumbers
- Eggplant
- Lettuce
- Basil and herbs
Tomatoes are especially popular because their deep roots easily reach the moisture reservoir.
Maintenance Tips for Bigger Harvests
Once your bucket garden is set up, maintenance is surprisingly simple.
Watering
Check the reservoir every few days. In cooler weather, you may only refill once a week.
Fertilizing
Always fertilize from the top of the soil, not the reservoir.
This prevents algae growth in the water chamber.
Soil health tips
- Use lightweight potting mix
- Add compost or organic fertilizer
- Top with mulch to reduce evaporation
With steady moisture, plants often produce stronger roots and higher yields than traditional containers.
Smart Upgrades for Advanced Gardeners
Once you’ve built one bucket garden, it’s easy to expand.
Some gardeners even connect multiple buckets together.
Popular upgrades
- Float valves to auto-fill reservoirs
- Multi-bucket irrigation chains
- Vertical bucket towers for small patios
- Upcycled containers like storage bins or barrels
These upgrades turn a simple DIY project into a compact food production system.
Final Thoughts
A self-watering bucket garden is one of the simplest and cheapest ways to grow food at home. With just a few basic materials, you can build a system that keeps plants hydrated, reduces watering time, and produces impressive harvests—even in small spaces.
The best part? Once it’s set up, the system practically takes care of itself.
So grab a bucket, drill a few holes, and start growing your own vegetables today.
🌱 Save this guide for later and start your DIY bucket garden this weekend!

Leave a Reply