
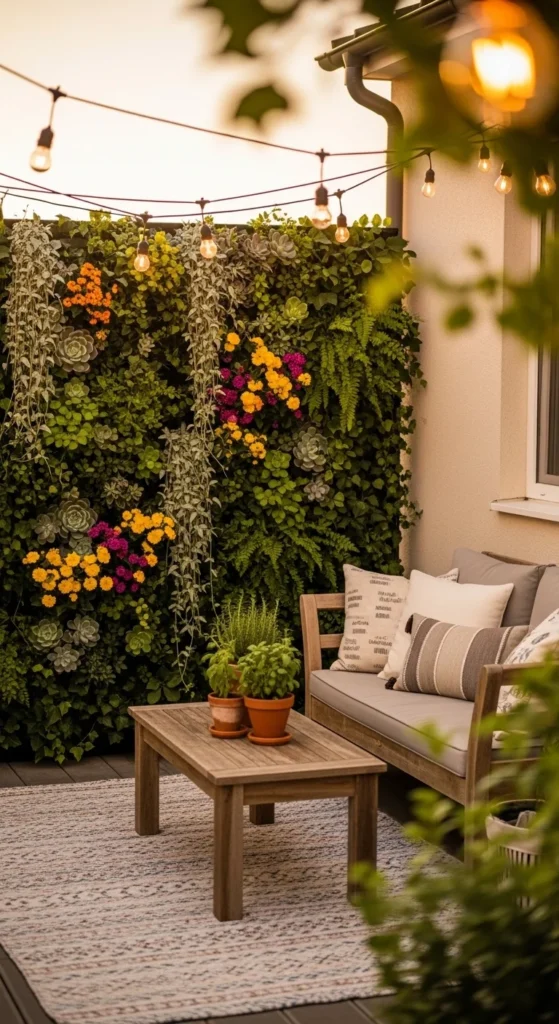
A patio should feel like a little outdoor living room — the kind of place where you want to linger with tea, host a casual BBQ, or unwind after a long day. And nothing upgrades that vibe faster than a vertical garden: a leafy wall of herbs, flowers, and trailing greens that adds privacy, softness, and instant “wow” without taking up your walking space.
The best part? You can build one that’s wind-stable, weather-ready, and easy to maintain — even if your patio gets full sun and lots of foot traffic.
Step 1: Pick the Right Spot (Comfort + Practicality)
Before you build, decide what your vertical garden needs to do.
Common patio goals:
- Privacy from neighbors
- A green backdrop for seating and photos
- A functional herb wall near the grill or kitchen door
- A “soft barrier” that separates dining from lounging
Quick patio placement tips:
- Leave at least 2–3 feet of walkway space so people can pass comfortably.
- Put it where watering is easy (near a hose bib/tap if possible).
- If you get harsh afternoon sun, aim for plants that can handle it (or add a shade sail nearby).
If wind is strong on your patio, choose a freestanding frame with real anchoring rather than a light wall-hung option.
Step 2: Choose Your Vertical Garden Style (Best Patio Options)
On patios, durability matters more than balcony setups. These options work especially well outdoors:
Freestanding “privacy wall” frame (most cozy)
- Two posts + a sturdy frame
- Pocket planters or mounted pots
- Doubles as a privacy screen
Wall-mounted rack (best for small patios)
- Metal rack with wood spacers so it’s not flush against the wall
- Great for lightweight pots and easy rearranging
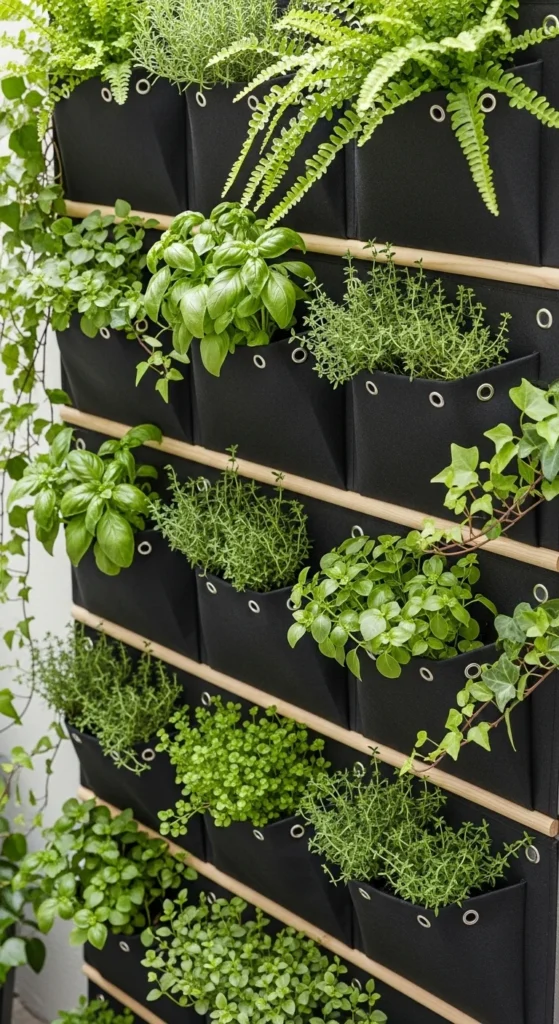
Pocket panel wall (fast coverage)
- Fabric pocket planters with grommets
- Mounted to runners (horizontal boards) for support
If you want that “luxury patio” feeling, go for a freestanding frame behind seating — it instantly makes the space feel more private and intentional.
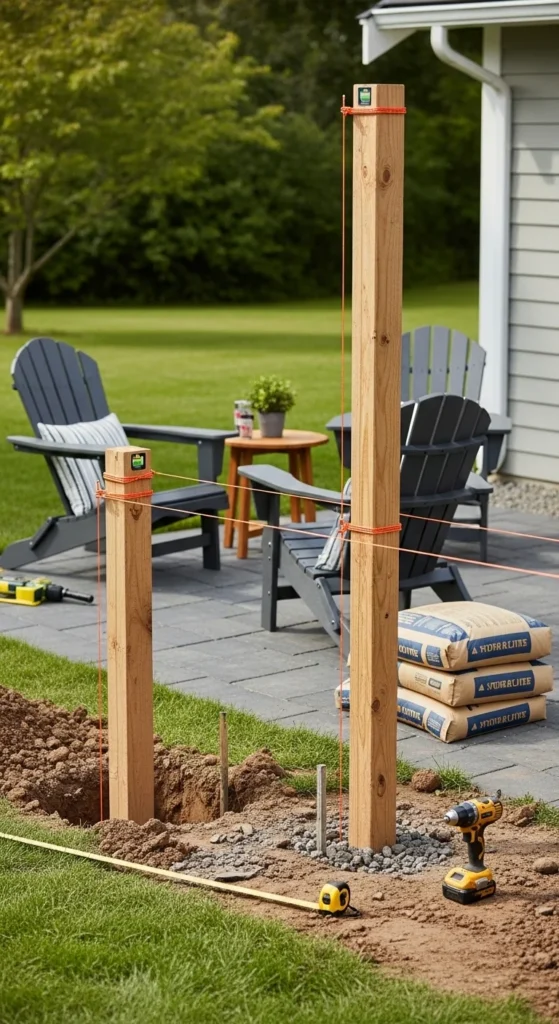
Step 3: Build a Wind-Proof Frame (So It Doesn’t Wobble)
This is where patios differ from balconies: wind + open space can topple tall planters if you don’t anchor properly.
For a truly stable patio wall:
- Use 6×6 posts (or similar strong posts)
- Set them with concrete footings
- Add cross-bracing inside the frame to prevent sagging
A solid method:
- Dig holes deep enough for stability (many DIY guides suggest roughly 30 inches for tall posts).
- Use string lines and a level so the posts stay straight while the concrete sets.
- Predrill before lag bolts to prevent wood splitting.
If you can’t dig into the ground (pavers/rental patio), you can still go sturdy:
- Use a wide base (like heavy planters or a weighted bottom box)
- Add diagonal bracing
- Keep height slightly lower and wider
Step 4: Add Planter Support That Won’t Sag
Once your frame is up, your next enemy is weight — soil gets heavy fast.
To prevent sagging:
- Install pressure-treated runners across the frame at consistent spacing (many builders use spacing around every 10–12 inches).
- For pocket systems, screw grommets into the runners so the pockets sit flat and don’t pull downward.
- Add a support board or cross-piece inside the frame (perpendicular bracing) to stop the runners from bowing.
Planting tip: pocket walls look full quickly, but don’t overcrowd.
- Start with 1–2 plants per pocket
- Fill in more once you see how they grow and overlap
Step 5: Protect Your Patio From Water Mess
A vertical garden is cozy… until it’s dripping muddy water across your outdoor rug.
Do this from day one:
- Put waterproof lining behind pocket panels (plastic sheet or outdoor barrier).
- Add a drip tray or narrow gravel strip at the bottom.
- Keep the “dirty water zone” away from seating legs and high-traffic areas.
If your garden is freestanding:
- Place a long planter trough at the base to catch runoff.
- Or use outdoor-rated floor mats under the wall.
Step 6: Upgrade With Drip Irrigation (The “Set It and Relax” Move)
If you want your patio garden to stay lush without daily watering, drip irrigation is the cheat code.
Easy options:
- A simple soaker hose line along the top row (gravity helps)
- Drip tubing with emitters for each pocket section
- A timer connected to your patio tap for hands-free watering
This is especially helpful for:
- Hot patios with full sun
- Busy weeks when you forget watering
- Keeping plants evenly hydrated (no dry top row!)
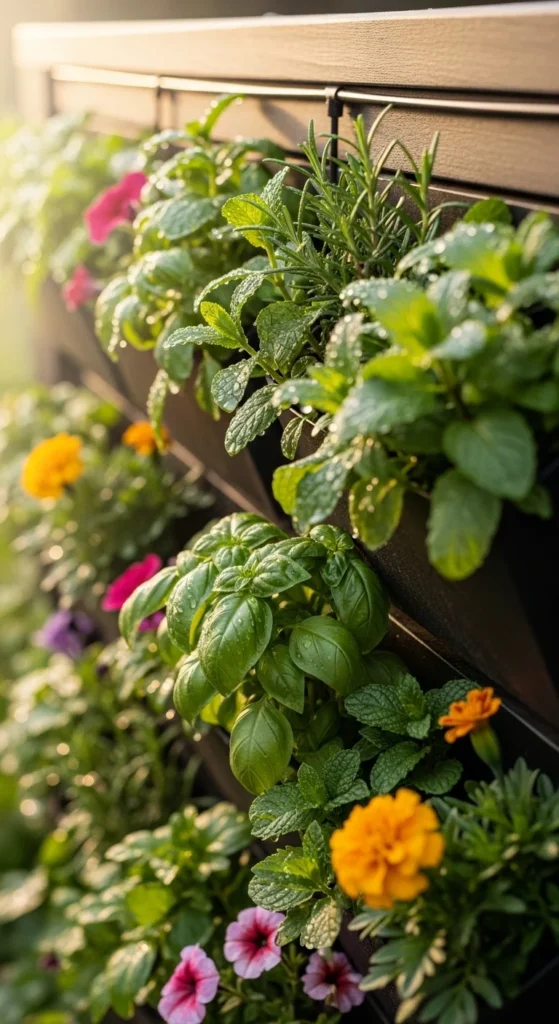
Step 7: Choose Plants That Match the Vibe You Want
Now the fun part: the “cozy outdoor vibes” plant list.
For a lush, private look
- Jasmine (climber)
- Ivy or pothos (trailing, if climate allows outdoors)
- Sweet potato vine
- Creeping Jenny
For patio entertaining + cooking
- Basil, mint, rosemary, thyme
- Cherry tomatoes (sun lovers)
- Peppers (compact and pretty)
For color and softness
- Petunias
- Calibrachoa
- Nasturtiums (edible + trailing)
Mix textures for that Pinterest look:
- Tall + trailing + pops of flowers
- Keep heavier plants toward the bottom rows for stability
Final Takeaway
A patio vertical garden isn’t just a “plant project” — it’s a vibe upgrade. It adds privacy, makes your seating area feel like an outdoor lounge, and turns plain walls into a living backdrop you’ll actually want to show off.
Start with a sturdy frame, plan drainage, and make watering easy — then let the greenery do the rest.
Save this idea for later and build your cozy patio garden this weekend!

Leave a Reply