
If bucket garden plants could talk, they’d beg for one thing: better drainage. Because when water gets trapped at the bottom, roots sit in soggy soil, oxygen disappears, and root rot moves in fast.
The good news? Drilling drainage holes is quick, cheap, and (with the right method) almost impossible to mess up—even if you’ve never touched a drill before.
What You Need (Simple Tools That Make It Easy)
You don’t need fancy equipment—just the right bit and a stable setup.
Tools + supplies:
- Cordless drill (or any basic drill)
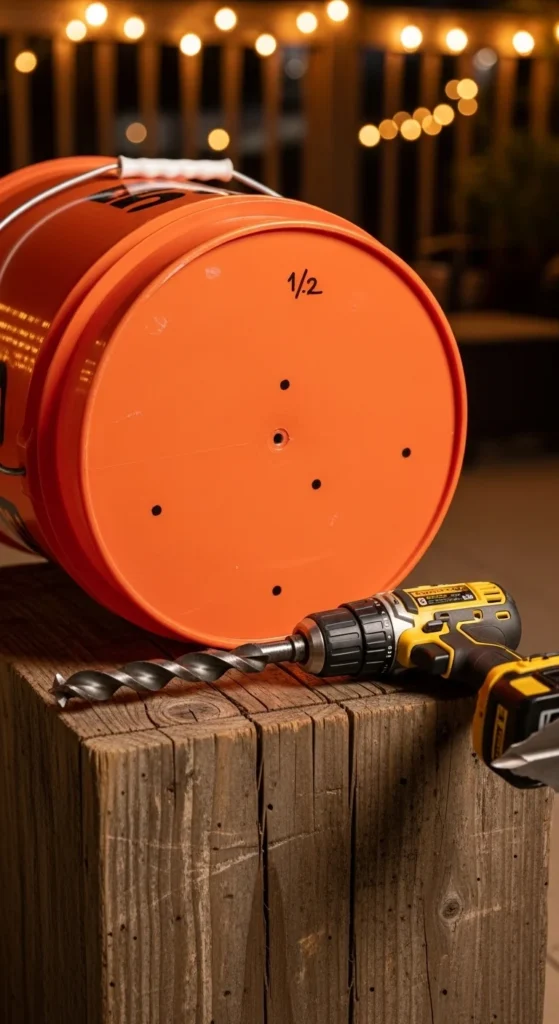
- ½-inch spade/paddle bit (best all-around size for drainage)
- Permanent marker (to mark hole locations)
- Scrap wood block (or a piece of 2×4) to support the bucket
- Safety gloves + eye protection (recommended)
- Sandpaper or utility knife (optional, for smoothing rough edges)
Why ½-inch? It’s big enough to resist clogging and drain fast, but not so big that it weakens the bucket.
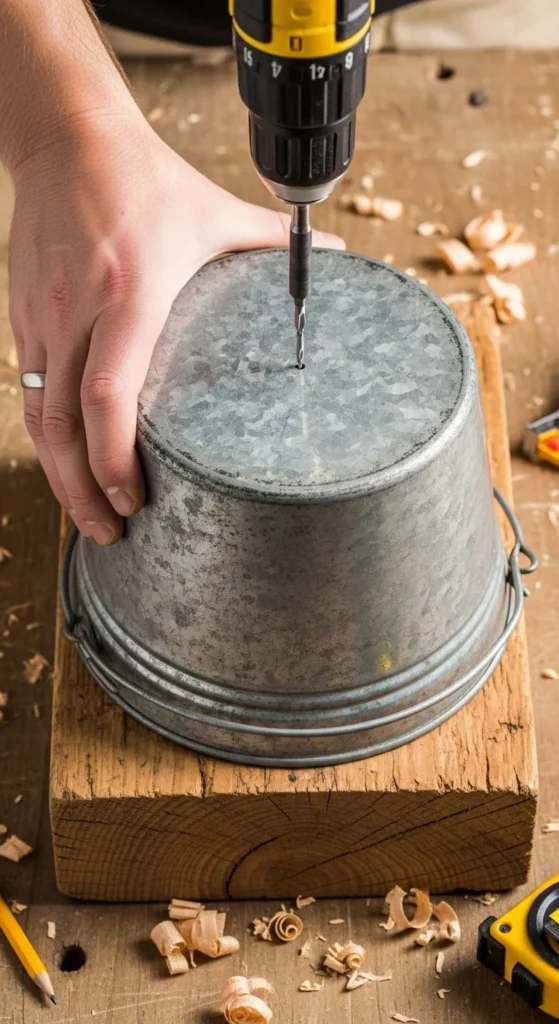
Step 1: Prep the Bucket So It Won’t Crack
Cracking usually happens when the bucket flexes while drilling. Fix that first and you’ll drill like a pro.
Stability hacks that work:
- Place a wood block directly under the drilling area
- Or fill the bottom with sand (for extra support if you’re working solo)
- Make sure the bucket is on a flat surface (driveway, patio, workbench)
Quick tip: If your bucket is cold and stiff (winter or early morning), let it warm up in the sun for a few minutes first. Plastic drills cleaner when it’s not icy-cold.
Step 2: Mark an Even Hole Pattern (So Water Doesn’t Pool)
Random holes can leave “wet pockets” where roots rot. A simple pattern gives you full drainage.
Best bottom-hole pattern for most 5-gallon buckets
- Drill 5–9 holes in the bottom
- Space them evenly in a circle/grid
- Avoid putting only one hole in the center
Easy patterns:
- 5-hole pattern: 1 center + 4 around it
- 9-hole pattern: 3×3 grid (even coverage)
Marking tip:
- Use a marker to make dots where each hole will go
- If you want extra precision, press a nail/screw tip into each dot to create a tiny starter “dent” so the bit doesn’t wander
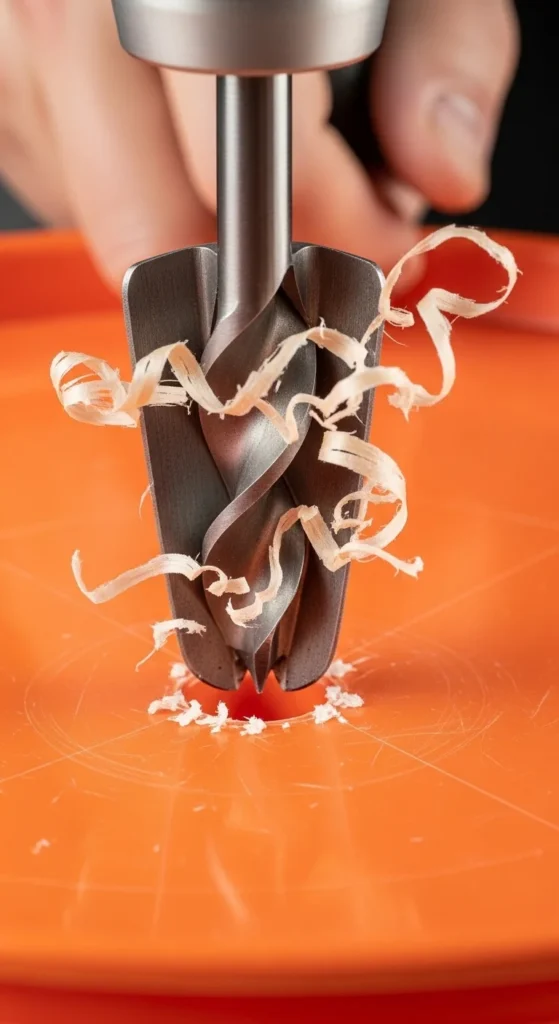
Step 3: Drill the Bottom Holes (Slow + Light Pressure = Clean Cuts)
This is the moment. The trick is to go slow so you don’t melt the plastic.
How to drill clean holes:
- Hold the drill straight (90° angle)
- Start slowly until the bit “bites”
- Use light pressure—let the bit do the work
- Pull out and move to the next dot
Avoid these common mistakes:
- Drilling too fast (melts plastic, creates messy edges)
- Pushing too hard (can crack the bucket)
- Drilling without support underneath (bucket flexes and splits)
Optional heat management (if plastic starts melting):
- Pause between holes
- You can even pre-soak the bucket briefly in water to keep it cooler during drilling
Step 4: Add Side Holes (The “Overflow Insurance” That Saves Plants)
Side holes are underrated—especially if you use saucers or your buckets sit on flat ground where bottom holes can get blocked.
Add 4–6 side holes:
- Place them 1–2 inches up from the bottom
- Space them evenly around the bucket
Why side holes help:
- Prevents water from stagnating at the bottom
- Helps in heavy rain or accidental overwatering
- Improves “360 drainage” for deep bucket fills
If you’re building a self-watering bucket (SIP), side/overflow holes matter even more—but the height depends on your reservoir design.
Step 5: Clean Up Shavings + Test Your Drainage
Those little plastic curls can clog holes later, especially if you water with compost tea or thicker fertilizers.
Quick cleanup checklist:
- Shake the bucket out
- Rinse the inside and bottom
- Remove any hanging plastic burrs (sandpaper or a knife)
Drainage test (takes 30 seconds):
- Place the bucket where you’ll use it
- Fill it partway with water
- Watch how evenly it drains
If water drains only from one side, add 1–2 holes where it’s slower.
No-Drill Options (For Renters or Zero-Tool Households)
No drill? You still have options—just be careful.
Heated tool method:
- Heat a sturdy screwdriver or metal rod and melt holes through the plastic
Important safety notes:
- Do this outside (fumes)
- Wear gloves
- Go slow to avoid messy, jagged holes
This method works, but drilling usually gives cleaner, more consistent results.
Quick Hole Guide (Copy This and You’re Done)
For a standard 5-gallon bucket used for vegetables:
- Bottom: 5–9 holes using a ½-inch spade bit
- Sides: 4–6 holes placed 1–2 inches up
- Speed: slow drill speed + light pressure
- Support: wood block (or sand) under the base
Final Takeaway
Drainage holes are the difference between a bucket garden that survives and one that thrives. Once you drill them correctly, you’ll prevent root rot, stop soggy soil problems, and make watering way easier.
📌 Save this guide for later—and the next time you set up buckets, you’ll nail drainage on the first try.

Leave a Reply